Chainer class introduction

Chainer is a library for deep learning. You can implement current trend network e.g. CNN (Convolutional Neural Network), RNN (Recurrent Neural Network) etc.

* The post is written in 2016 July, with Chainer version 1.10, but Chainer is still in active development and some of the functionality specification may change in the future.

Variable, functions, links and Chain

At first, please read Introduction to Chainer. To summarize, input – output relationship of deep neural network is maintained by computational graph internally, which is constructed using Variablefunctionslinks and Chain. Once deep neural network is constructed, forward/backward propagation can be executed for training.

  • Variable
    Variable
     will be used as an input of FunctionsLinks and Chain.
    Ex, below code declares Variable x, and can be used as a argument of FunctionsLinks and Chain.
    x = Variable(np.array([[1, 2, 3], [4, 5, 6]], dtype=np.float32))
  • Functions
    Functions define calculation of Variable. When you want to proceed calculation with Variable, you need to use Functions, instead of standard math library. Note that you can also use arithmetric operator, +, – , *, / etc for calculation with Variable.
    Ex 1. F.sum(x) calculate sum of array x.
    Ex 2.F.sigmoid(x) calculate sigmoid function in element wise.
  • Links
    Links consist of Functions and some parameters (which may be tuned in training phase). It is one component of functions, it is often the case that Links can also be considered as one layer of the neural network.
    Ex 1. L.Linear(3, 2) defines fully connected layer from 3 units to 2 units.
    Ex 2. L.Convolution2D(8, 16, 3) defines Convolutional layer from 8 input channel (feature map) to 16 output channel (feature map) with kernel size (filter size of convolution) 3×3.
  • Chain
    Chain consists of Links and Functions. It is used todefine deep neural network.
    Chain itself is subclass of Link.
    Ex (explained detail later). below chain “basic_cnn_small” consists of 3 convolutional layer, and leaky_relu & clipped_relu are used for activation function.
class basic_cnn_small(Chain):
    """
    Basic CNN model.
    The network consists of Convolutional layer and leaky relu is used for activation
    """
    def __init__(self, inout_ch):
        super(basic_cnn_small, self).__init__(
            conv1=L.Convolution2D(in_channels=inout_ch, out_channels=8, ksize=3, stride=1),
            conv2=L.Convolution2D(8, 16, 3, stride=1),
            conv3=L.Convolution2D(16, inout_ch, 3, stride=1),
        )
        self.train = True

    def __call__(self, x, t=None):
        self.clear()

        h = F.leaky_relu(self.conv1(x), slope=0.1)
        h = F.leaky_relu(self.conv2(h), slope=0.1)
        h = F.clipped_relu(self.conv3(h), z=1.0)
        if self.train:
            self.loss = F.mean_squared_error(h, t)
            return self.loss
        else:
            return h

    def preprocess_x(self, x_data):
        """
        model specific preprocessing
        :param x_data:
        :return:
        """
        scaled_x = image_processing.nearest_neighbor_2x(x_data)
        return image_processing.image_padding(scaled_x, total_padding // 2)

    def clear(self):
        self.loss = None
        # self.accuracy = None

 After defining Chain class, it can be instantiated (to model variable)

import arch.basic_cnn_small as model_arch
model = model_arch.basic_cnn_small(inout_ch=inout_ch)

These classes are imported by

from chainer import Variable, Chain
import chainer.functions as F
import chainer.links as L


Comment: whole Chain definition is done by python language, Chainer does not use any definition file for the neural network. This is contrary to some of the famous machine learning library e.g. caffe, which uses proto.txt for the definition of neural network. This specification comes from one of the core concept of Chainer, “define by run” scheme, so that you don’t need to pre-define the neural network model before executing the code.

Optimizer and Serializer

Optimizer and Serializer acts as helper function for Chain class. They introduce convenient tool/functionality to the Chain class.

  • OptimizerIt helps to train the parameter of model (Chain).
    * the parameters are defined in Chainlinks.
    Ex 1.  optimizer = optimizers.SGD() Prepare optimizer for Stocastic gradient descent method.
    Ex 2. optimizer = optimizers.Adam(alpha=0.0001) Prepare optimizer for ADAM method.
  • SerializerIt  provides the method for save/load the model with Chain class.
    Ex 1. save the model (after training) serializers.save_npz('my.model', model)
    Ex 2. load the model (for inference) serializers.load_npz(model_load_path, model)

SeRanet: Quick start guide

This post explains SeRanet project, super resolution software through deep learning.

Preparation

Dependencies – third party library

Install python, pip

The software is written in python, and I’m using python version 2.7.6.

If you are using OS Ubuntu 14.04, python2 is pre-installed by default. So you don’t need to install explicitly. The version of python can be checked by typing 

$ python -V

 in the terminal.

If you can’t find python, then try below.

$ sudo apt-get install python python-dev

To install third party python library, pip command is often used. To install pip, type below in command line

$ sudo apt-get install python-pip

Install popular libraries, numpy, scipy, matplotlib

numpy, scipy, matplotlib are widely used for data processing in python.

$ sudo apt-get install python-numpy python-scipy python-matplotlib

Install OpenCV

OpenCV is used for image processing. See Installation page for installation.

There are several ways to install OpenCV, try below methods if you could not install.

1. Install by pip

$ sudo pip install cv2

2. Install python-opencv

$ sudo apt-get install python-opencv

Ref: Installing OpenCV for Python on Ubuntu, getting ImportError: No module named cv2.cv

3. Install using script

Create a file named “opencv.sh” and write following,

version="$(wget -q -O - http://sourceforge.net/projects/opencvlibrary/files/opencv-unix | egrep -m1 -o '\"[0-9](\.[0-9]+)+' | cut -c2-)"
echo "Installing OpenCV" $version
mkdir OpenCV
cd OpenCV
echo "Removing any pre-installed ffmpeg and x264"
sudo apt-get -qq remove ffmpeg x264 libx264-dev
echo "Installing Dependenices"
sudo apt-get -qq install libopencv-dev build-essential checkinstall cmake pkg-config yasm libjpeg-dev libjasper-dev libavcodec-dev libavformat-dev libswscale-dev libdc1394-22-dev libxine-dev libgstreamer0.10-dev libgstreamer-plugins-base0.10-dev libv4l-dev python-dev python-numpy libtbb-dev libqt4-dev libgtk2.0-dev libfaac-dev libmp3lame-dev libopencore-amrnb-dev libopencore-amrwb-dev libtheora-dev libvorbis-dev libxvidcore-dev x264 v4l-utils ffmpeg cmake qt5-default checkinstall
echo "Downloading OpenCV" $version
wget -O OpenCV-$version.zip http://sourceforge.net/projects/opencvlibrary/files/opencv-unix/$version/opencv-"$version".zip/download
echo "Installing OpenCV" $version
unzip OpenCV-$version.zip
cd opencv-$version
mkdir build
cd build
cmake -D CMAKE_BUILD_TYPE=RELEASE -D CMAKE_INSTALL_PREFIX=/usr/local -D WITH_TBB=ON -D BUILD_NEW_PYTHON_SUPPORT=ON -D WITH_V4L=ON -D INSTALL_C_EXAMPLES=ON -D INSTALL_PYTHON_EXAMPLES=ON -D BUILD_EXAMPLES=ON -D WITH_QT=ON -D WITH_OPENGL=ON ..
make -j2
sudo checkinstall
sudo sh -c 'echo "/usr/local/lib" > /etc/ld.so.conf.d/opencv.conf'
sudo ldconfig
echo "OpenCV" $version "ready to be used"

Then execute this shell script.

Ref: OpenCV on Ubuntu community

4. PYTHONPATH setting

Add following for your ~/.bashrc 

export PYTHONPATH=/usr/local/lib/python2.7/site-packages:$PYTHONPATH

Install Chainer

Chainer is open source library for implementing neural networks. SeRanet uses chainer library to implement convolutional neural network (CNN) to achieve super resolution deep learning.

Follow github page for installation. Minimum installation (= only use CPU) is easy, just type

$ pip install -U setuptools
$ pip install chainer

suffices.

* In my environment I needed to install google apputils beforehand

$ sudo pip install google-apputils

Use GPU (Skip this process if you don’t have NVIDIA GPU)

For machine learning, a lot of calculation will be executed during the training and setting up GPU (enable CUDA, cuDNN) accelerates the calculation. It is highly recommended to prepare NVIDIA GPU and setup it if you want to do deep learning seriously.

(I’m running the code with GTX 980 Ti in my develop environment)

  • CUDA setup

Follow the section “Installation with CUDA” on github page for GPU setup.

  • cuDNN setup

cuDNN, NVIDIA CUDA Deep Neural Network library, is GPU-accelerated library. GPU can be used by only installing the CUDA, however enabling cuDNN enhances the efficiency GPU usage much more. Especially, GPU memory efficiency is significantly improved by enabling cuDNN and it is necessary for running big size Convolutional Neural Network of SeRanet.

 To install cuDNN, you need to register developer account on NVIDIA website to download cuDNN library.

Clone SeRanet

Clone project into your local PC.

$ git clone --depth 1 https://github.com/corochann/SeRanet.git

Download training_images 

Skip this process if you are not running training.

I’m using PEXELS photos for the training of SeRanet.

  • PEXELSThe website provides high quality photos under Creative Commons Zero (CC0) license.

Thanks to the pexels team and photographers, I can re-distribute training images dataset which I used. It consists of 5000 medium size PEXELS photos. You can download from below,

After extract, copy this to data/training_images to start your own training.

Running the inference code

The explanation will be done later, let’s try running the sample code for Upscaling the image anyway.

Go to SeRanet directory and type

$ python src/inference.py path-to-input-image.jpg -a basic_cnn_small

Then it will upscale a picture and save the output image into same directory with input image. -a option specifies the covolutional neural network architecture, and “basic_cnn_small” is used in above example. This architecture is for testing purpose (calculation is very small compared to other architecture) so that even you use CPU, it works without problem.

But of course, if you want to get a good picture upscaling/super resolution result, you must choose the better architecture

$ python src/inference.py path-to-input-image.jpg -a seranet_v1
1$ python src/inference.py path-to-input-image.jpg -a seranet_v1

For CPU user, it might take a long time to convert image using seranet_v1 architecture. In this case, please try to use smaller image as input.

For GPU user (after setup CUDA and cuDNN), you can specify -g option to use GPU. 

$ python src/inference.py path-to-input-image.jpg -a seranet_v1 -g 0

Running the training code

Go to SeRanet directory and type

$ python src/train.py -a basic_cnn_small -c yonly

-a option specifies the model architecture to train.

-c option specifies the color scheme for the model. ‘yonly’ and ‘rgb’ are available.

For more information please look the SlideShare material.

IntelliJ Plugin Development introduction: GUI form designing

This post explains IntelliJ IDEA Plugin development.

GUI form and Dialog

IntelliJ provides 2 types of GUI component called GUI form and Dialog. IntelliJ uses special XML format with extension .form to design GUI component. Form is similar to Android’s res/layout xml files, and it makes easy to developing GUI on IntelliJ platform.

Ref

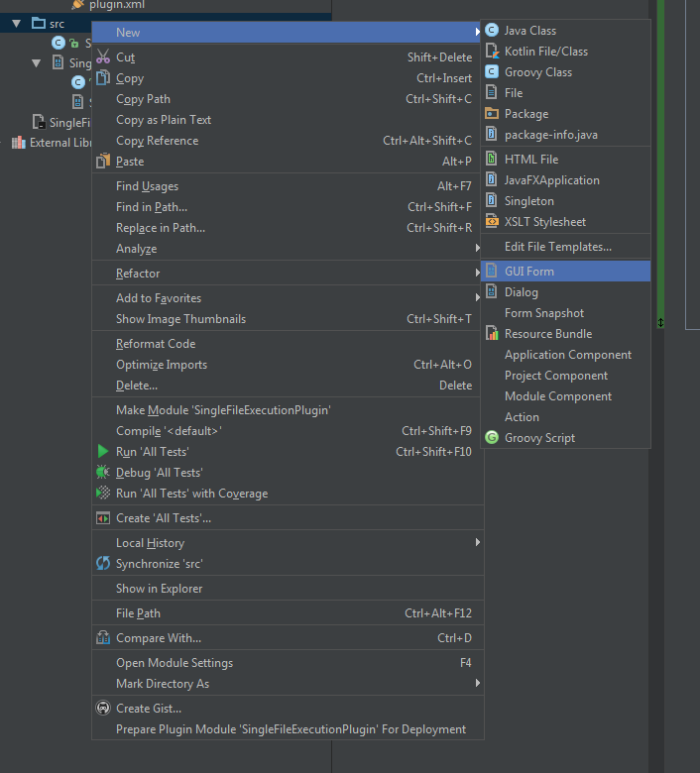
Creating new GUI form or Dialog can be done by right click on src → New → GUI Form or Dialog. Detail explanation for each GUI component is done later. 

For both components, form file (extension .form) and bound class (extension .java) will be created.

Designing GUI component for IntelliJ can be done using UI designer tool, it is similar to Android development.

Understanding .form

What is the relationship beween automatically generated .form file and its boud .java class? At first it is not obvious that why desigining .form file indeed affects to bound JAVA class. 

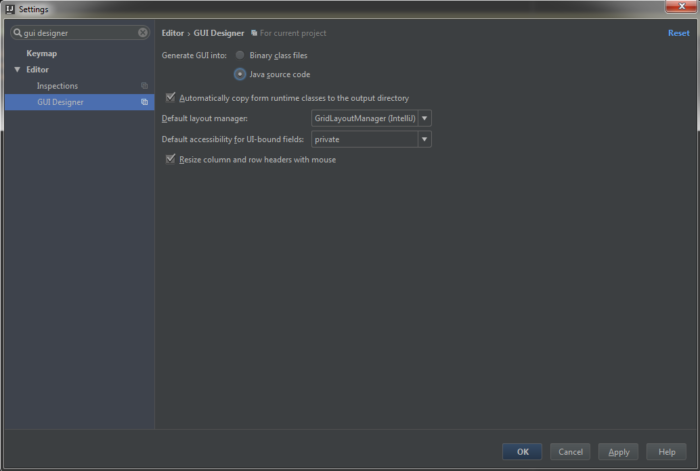
You can understand this relationship more easily by configuring, File → Settings → Editor > GUI Designer → Generate GUI info → tick “Java source code” (“Binary class files” is selected as default).

After this configuration, select Build → Make Project, then you can notice code is automatically generated and inserted to the bound class. Concretely, $$$setupUI$$$() method is automatically generated based on your form design and that’s why we can use UI component instance in bound class.

According to the official doc,

the GUI Designer writes Java source code for the form and its components to the source file of the class to which the form is bound, on compiling, running or debugging. During compilation, two blocks of code are added to the form’s class:

  • A private method $$$setupUI$$$() that contains the GUI initializer code for the bound form and its components.
  • A call to the $$$setupUI$$$() method.

Do not change the generated method, or call it from any other code. If you manually modify GUI initializer code, your UI will no longer be in sync with the .form file, and the next compilation will overwrite your changes.

GUI Designer

You can also see build class at out/production/.../bound_class_name.class.

Ref

GUI Form

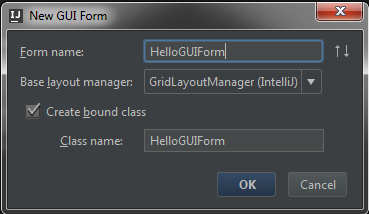
Creating new GUI form can be done by right click on src → New → GUI Form. After putting “Form name”, IntelliJ automatically generates .form file and Java bound class.

Specify Form name.

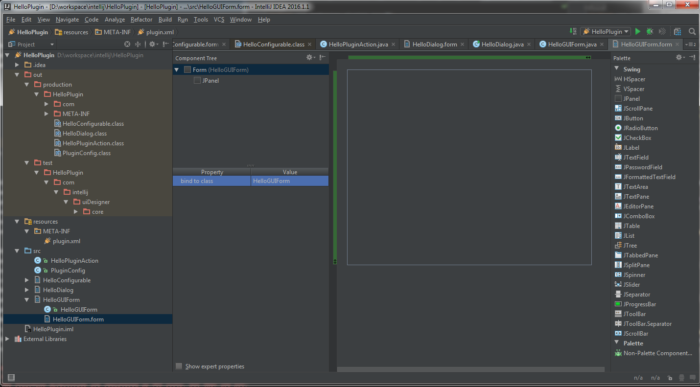
IntelliJ automatically generate form file and bound class. In this case, HelloGUIForm.form and HelloGUIForm.java will be created.

For the example of usage of GUI Form, please refer “IntelliJ Plugin Development introduction: ApplicationConfigurable, ProjectConfigurable“.

Dialog

Creating new Dialog can be done by right click on src → New → Dialog. After putting dialog class name, IntelliJ automatically generates .form file and Java bound class.

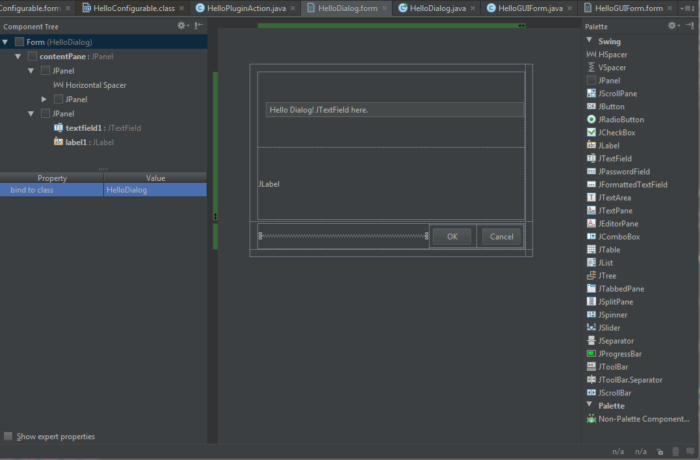
Let’s do a little bit of hands on to understand how to use. I created a new dialog called HelloDialog here. When you see automatically generated HelloDialog.java class, some code implementation is already done. So you can concentrate on your own UI Development.

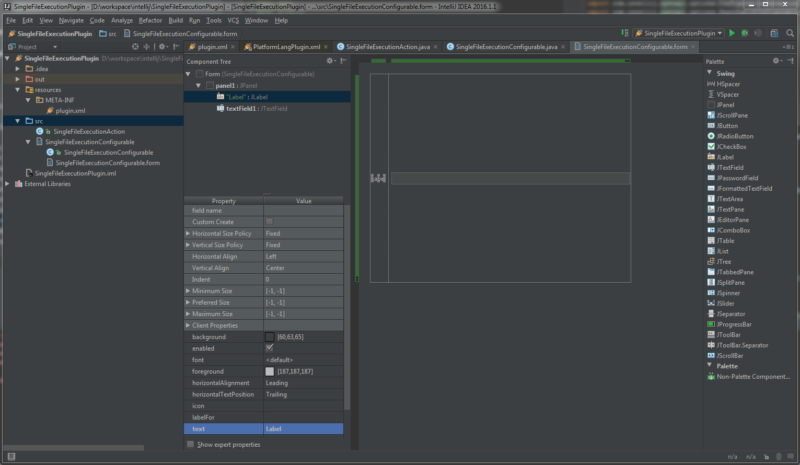
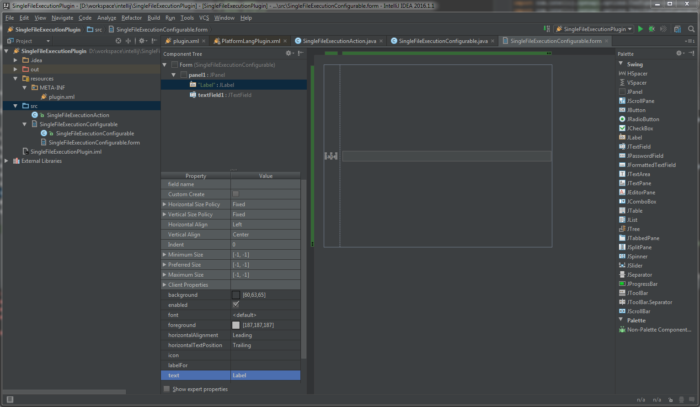
Open HelloDialog.form form file and design it, I added following as you can see below picture

  • JTextField:It allows user to type text in one line (use JTextArea for multiple line text edit)
  • JLabel: It shows some text, which cannot be editted.

After modifying form file and if you go back to Java class file, you can see the source code is automatically added/modified so that you can use JTextField instance for example.

Finally, when you want to show this Dialog, just call

HelloDialog.main()

where you want to show this dialog.

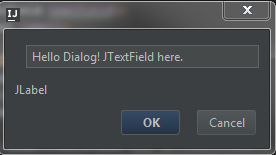
Once you run your plugin, you can see dialog pops up like this.

Working example

I uploaded Single File Execution Plugin on github. One may refer this implementation to understand GUI implementation.

IntelliJ Plugin Development introduction: PersistStateComponent

This post explains IntelliJ IDEA Plugin development.

The source code explained here is uploaded in official repository as a CLion plugin, please check Single File Execution Plugin on github.

Save value for IntelliJ Plugin

If your plugin want to keep some configuration value and you want to save the values in storage, PersistentStateComponent can be used in IntelliJ IDEA plugin development.

Ref

Make a class implments PersistentStateComponent

Create new Java class, and add implements PersistentStateComponent<T>.

Following hands on example, I will introduce easy quick implementation for this class. I made SingleFileExecutionConfig class which implements PersistentStateComponent<SingleFileExecutionConfig>. So the State type T is same with created class.

To implement this interface PersistentStateComponent<T>, we need to override

  • getState()
    called every time the settings are saved. If the state returned from getState() is different from the default state obtained by default constructor, the returned state is serialized in XML and stored.
  • loadState(T)
    called when the component has been created, and after the XML file with the persisted state is changed externally.

and it is nice to implement getInstance method.

For the implementation of these 3 methods, you don’t need to remember about above behavior. Just implement as following template. 

/**
 * PersistentStateComponent keeps project config values.
 */
@State(
 name="SingleFileExecutionConfig",
 storages = {
 @Storage("SingleFileExecutionConfig.xml")}
)
public class SingleFileExecutionConfig implements PersistentStateComponent<SingleFileExecutionConfig> {

    @Nullable
    @Override
    public SingleFileExecutionConfig getState() {
        return this;
    }

    @Override
    public void loadState(SingleFileExecutionConfig singleFileExecutionConfig) {
        XmlSerializerUtil.copyBean(singleFileExecutionConfig, this);
    }
    @Nullable
    public static SingleFileExecutionConfig getInstance(Project project) {
        return ServiceManager.getService(project, SingleFileExecutionConfig.class);
    }
}

Note that  for the getService method in getInstanceproject variable is necessary when your PersistentStateComponent is project level. If your service is application level, project instance is not necessary.

See 

@State annotation – specify the storage location to be saved

As you may notice, @State annotation is written at the top. This is to specify where the persisted values will be stored. For the fields,

  • name (required) – specifies the name of the state.
  • storages – specify the storage locations
    Example,
    @Storage("yourName.xml") If component is project-level
    @Storage(StoragePathMacros.WORKSPACE_FILE) for values stored in the workspace file.

See official doc’s “Defining the storage location” for more details.

After that, you can just declare variables which will be saved, and the Getter and Setter of these variables. For example, to declare one String variable executableName, add below code to this class.

    String executableName;

    public String getExecutableName() {
        return executableName;
    }

    public void setExecutableName(String executableName) {
        this.executableName = executableName;
    }

Declaring PersistentStateComponent in plugin.xml

To use this PersistentStateComponent, declaration in plugin.xml is necessary.

  <extensions defaultExtensionNs="com.intellij">
    ...
    <projectService serviceInterface="SingleFileExecutionConfig" serviceImplementation="SingleFileExecutionConfig"/>
  </extensions>

Using PersistentStateComponent from the other module

Let’s consider a case that you want to use created SingleFileExecutionConfig class from Configurable class (see IntelliJ Plugin Development introduction: ApplicationConfigurable, ProjectConfigurable for explanation of Configurable).

The instance can be obtained by calling getInstance method. For example,

    private final SingleFileExecutionConfig mConfig;

    @SuppressWarnings("FieldCanBeLocal")
    private final Project mProject;

    public SingleFileExecutionConfigurable(@NotNull Project project) {
        mProject = project;
        mConfig = SingleFileExecutionConfig.getInstance(project);
    }

To update the value, you can just directly update the field variable of this instance (mConfig). No explicit “save” method call is needed! The value is automatically saved when you get the value in next time.

Below code is an example for the variable updating part. this apply() method is called when user change the configuration in Settings dialog.

    public void apply() {
        mConfig.setExecutableName(exeNameTextField.getText());
        mConfig.notShowOverwriteConfirmDialog = notShowDialogCheckBox.isSelected();
    }

Check the source code for more detail.

IntelliJ Plugin Development introduction: ApplicationConfigurable, ProjectConfigurable

[Update 2016.5.12] I uploaded Single File Execution Plugin on github.

This post is for IntelliJ IDEA Plugin development.

Configurable – Adding a configuration menu of Plugin to the Settings dialog

If your plugin want user to allow some settings, we want to show configuration UI. We can show it on the IDEA settings dialog by implementing Configurable.

This post introduces quick implementation for ApplicationConfigurable and ProjectConfigurable. I’m summarizing it because I could not find many references for IntelliJ IDEA Plugin development, and I also might have mistake.

Ref: 

Making class implements Configurable

At first, create new java class. Here I made SingleFileExecutionConfigurable.java. Let this class implement SearchableConfigurable.

SearchableConfigurable is a subclass of Configurable, and the class which implements Configurable class can be shown on Settings dialog. You need to override following methods to implement this interface. Note that you can understand what method which needs to be override by using shortcut key for override in IntelliJ. See Configurable IDEA for more details.

  • getDisplayName()
        return the name which you want to show on the Settings dialog.
        Ex. “Single File Execution Plugin” 
  • getHelpTopic()
        Ex “preference.SingleFileExecutionConfigurable”
        
  • getId()
        return id
        Ex “preference.SingleFileExecutionConfigurable”
  • enableSearch(String s)
        It can be null. You can set some action to be performed when searched. 
  • createComponent()
         You can create GUI component here, and return JComponent.
         UI component returned here will be shown on the Settings menu.
  • isModified()
        This is to enable/disable “apply” button in the Setting dialog.
        Return true when you want to enable “apply” button.
        You need to implement a logic to check the configuration is updated or not, and decide to return true or false.
  • apply()
        It is called when “apply” or “ok” button is pressed.
        Implement a logic to update configuration.
  • reset()
        It is called when “apply” or “ok” button is pressed.
        Implement a logic to reset the configuration.
  • disposeUIResources()
        It is called when UI component becomes not necessary.
        You can implement finalization logic here to release memory.

Skeleton code after just overriding this method, and specifying display name and helptopic is the following. 

import com.intellij.openapi.options.ConfigurationException;
import com.intellij.openapi.options.SearchableConfigurable;
import org.jetbrains.annotations.Nls;
import org.jetbrains.annotations.NotNull;
import org.jetbrains.annotations.Nullable;

import javax.swing.*;

/**
 * This ProjectConfigurable class appears on Settings dialog,
 * to let user to configure this plugin's behavior.
 */
public class SingleFileExecutionConfigurable implements SearchableConfigurable {

    SingleFileExecutionConfigurableGUI gui;

    @Nls
    @Override
    public String getDisplayName() {
        return "Single File Execution Plugin";
    }

    @Nullable
    @Override
    public String getHelpTopic() {
        return "preference.SingleFileExecutionConfigurable";
    }

    @NotNull
    @Override
    public String getId() {
        return "preference.SingleFileExecutionConfigurable";
    }

    @Nullable
    @Override
    public Runnable enableSearch(String s) {
        return null;
    }

    @Nullable
    @Override
    public JComponent createComponent() {
        return null;
    }

    @Override
    public boolean isModified() {
        return false;
    }

    @Override
    public void apply() throws ConfigurationException {

    }

    @Override
    public void reset() {

    }

    @Override
    public void disposeUIResources() {

    }
}

Modify plugin.xml

plugin.xml is to declare your plugin’s modules, it is similar to AndroidManifest.xml of Android app. To use Configurable class, you should add following code to plugin.xml

  <extensions defaultExtensionNs="com.intellij">
    <applicationConfigurable groupId="tools" displayName="Single File Execution Plugin" id="preferences.SingleFileExecutionConfigurable" instance="SingleFileExecutionConfigurable" />
  </extensions>

  • displayName
     – Specify display name, should be same with getDisplayName().
  • id – unique id
  • instance – Specify Configurable class to be instanced.

Once it’s creating Configurable class and declaration of plugin.xml is done, you can build and run to see the result.

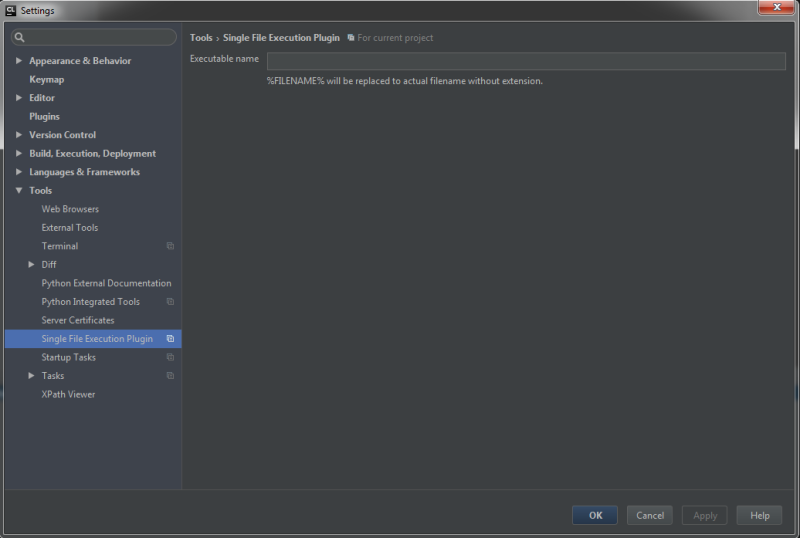
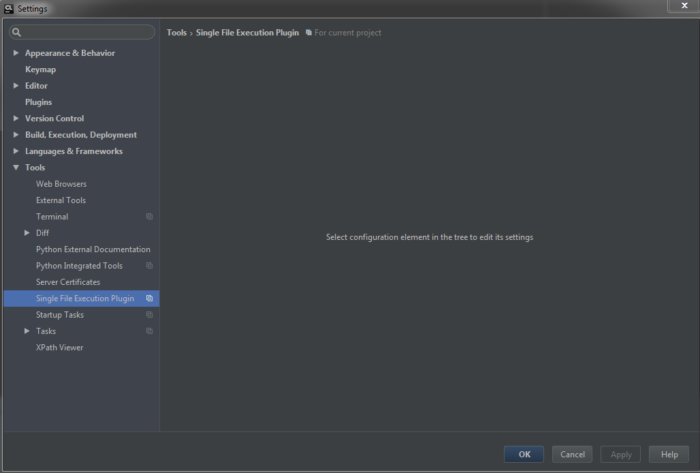
Your plugin configuration display appears in IntelliJ settings dialog.

We can see our configuration display appears in the settings inside Tools tab, as specified in groupId attribute of plugin.xml. For now this dialog have no UI on the right side. Because createComponent method is returning null so far. Let’s design GUI for this configurable.

Making GUI class

We want to design UI for the configuration, which can be designed by GUI form. We can generate GUI form, set of JAVA class and form, by right click src → New → GUI form. If you are not familiar with UI development for IntelliJ plugin, please check Search intell IntelliJ Plugin Development introduction: GUI form designing.  

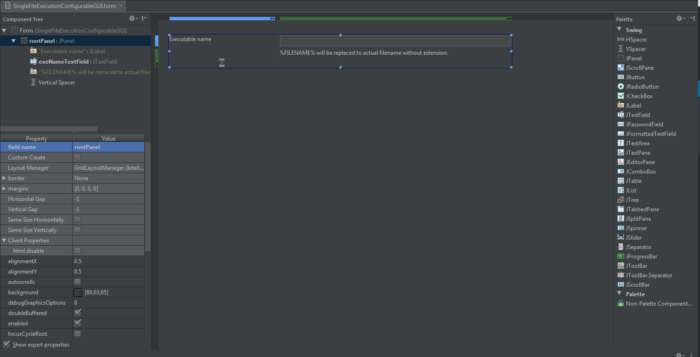
Designing .form file. Specify field name for the root JPanel.

Then design .form file to create own GUI using GUI designer tool.

For example I put Jlabel and JTextField to let user to configure executable name. The Vertical Spacer in the last row has a value “Want Grow” with Property Vertical Size Policy, and it is used to make the other components to go top.

Once designing has done, important part here is to get root Panel’s instance by specifying “field name” property in .form file. When field name has set, IntelliJ automatically creates a reference for this component in the bound class, for example in this example we get below code

import com.intellij.uiDesigner.core.GridConstraints;
import com.intellij.uiDesigner.core.GridLayoutManager;
import com.intellij.uiDesigner.core.Spacer;

import javax.swing.*;
import java.awt.*;

/**
 * GUI for the {@link SingleFileExecutionConfigurable}
 */
public class SingleFileExecutionConfigurableGUI {
    private JPanel rootPanel;
    private JTextField exeNameTextField;

    SingleFileExecutionConfigurableGUI() {

    }

    public JPanel getRootPanel() {
        return rootPanel;
    }

    {
// GUI initializer generated by IntelliJ IDEA GUI Designer
// >>> IMPORTANT!! <<<
// DO NOT EDIT OR ADD ANY CODE HERE!
        $$$setupUI$$$();
    }

    /**
     * Method generated by IntelliJ IDEA GUI Designer
     * >>> IMPORTANT!! <<<
     * DO NOT edit this method OR call it in your code!
     *
     * @noinspection ALL
     */
    private void $$$setupUI$$$() {
        rootPanel = new JPanel();
        rootPanel.setLayout(new GridLayoutManager(3, 2, new Insets(0, 0, 0, 0), -1, -1));
        rootPanel.setRequestFocusEnabled(true);
        final JLabel label1 = new JLabel();
        label1.setText("Executable name");
        rootPanel.add(label1, new GridConstraints(0, 0, 1, 1, GridConstraints.ANCHOR_NORTHWEST, GridConstraints.FILL_NONE, GridConstraints.SIZEPOLICY_CAN_SHRINK | GridConstraints.SIZEPOLICY_CAN_GROW, GridConstraints.SIZEPOLICY_CAN_SHRINK | GridConstraints.SIZEPOLICY_CAN_GROW, null, new Dimension(80, 16), null, 0, false));
        exeNameTextField = new JTextField();
        exeNameTextField.setAutoscrolls(true);
        exeNameTextField.setEditable(true);
        exeNameTextField.setEnabled(true);
        exeNameTextField.setHorizontalAlignment(10);
        rootPanel.add(exeNameTextField, new GridConstraints(0, 1, 1, 1, GridConstraints.ANCHOR_NORTH, GridConstraints.FILL_HORIZONTAL, GridConstraints.SIZEPOLICY_CAN_SHRINK | GridConstraints.SIZEPOLICY_WANT_GROW, GridConstraints.SIZEPOLICY_CAN_SHRINK | GridConstraints.SIZEPOLICY_CAN_GROW, null, null, null, 0, false));
        final JLabel label2 = new JLabel();
        label2.setText("%FILENAME% will be replaced to actual filename without extension.");
        label2.setVerticalAlignment(0);
        rootPanel.add(label2, new GridConstraints(1, 1, 1, 1, GridConstraints.ANCHOR_NORTHWEST, GridConstraints.FILL_NONE, GridConstraints.SIZEPOLICY_CAN_SHRINK | GridConstraints.SIZEPOLICY_CAN_GROW, GridConstraints.SIZEPOLICY_CAN_SHRINK | GridConstraints.SIZEPOLICY_CAN_GROW, null, null, null, 0, false));
        final Spacer spacer1 = new Spacer();
        rootPanel.add(spacer1, new GridConstraints(2, 0, 1, 1, GridConstraints.ANCHOR_CENTER, GridConstraints.FILL_VERTICAL, 1, GridConstraints.SIZEPOLICY_WANT_GROW, null, null, null, 0, false));
        label1.setLabelFor(exeNameTextField);
    }

    /**
     * @noinspection ALL
     */
    public JComponent $$$getRootComponent$$$() {
        return rootPanel;
    }
}

Note that I only implement empty constuctor and getRootPanel method. All the other, including the declaration of rootPanel and exeNameTextField, is automatically generated.

To get this GUI from SingleFileExecutionConfigurable class, implement createComponent and disposeUIResources as follows.

public class SingleFileExecutionConfigurable implements SearchableConfigurable {

    SingleFileExecutionConfigurableGUI mGUI;

    @Nullable
    @Override
    public JComponent createComponent() {
        mGUI = new SingleFileExecutionConfigurableGUI();
        return mGUI.getRootPanel();
    }

    @Override
    public void disposeUIResources() {
        mGUI = null;
    }
}

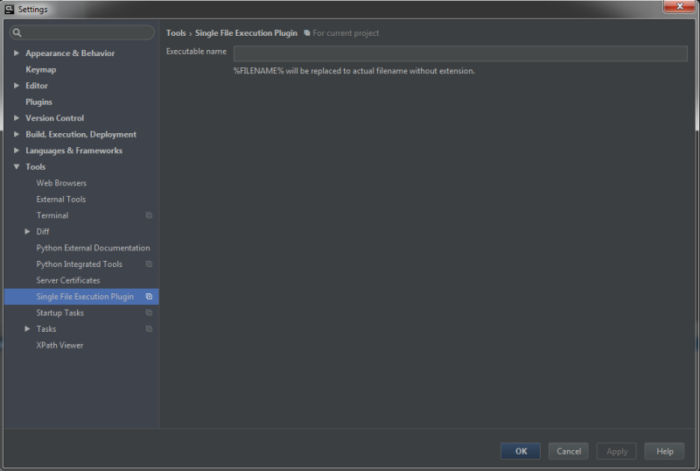
That’s all for UI development for configurable, now you can see that the UI take effect by build and running the project. 

Getting a project instance

If you are developing ProjectConfigurable, you might want to get project instance. We can get the instance by creating a constructor with Project argument.

    public SingleFileExecutionConfigurable(@NotNull Project project) {
        // you can get project instance as an argument of constructor
        mProject = project;
        mConfig = SingleFileExecutionConfig.getInstance(project);
    }

Save the configuration using PersistentStateComponent

Final step, we need to save user’s configuration in storage. We can do so using PersistentStateComponent for IntelliJ. This is similar concept to Preference for Android platform, so that the value can be stored in xml format and we can extract these values in JAVA file.

For more details, I wrote an another post “IntelliJ Plugin Development introduction: PersistStateComponent” so please check it.

If you get lost…

There are sometimes few information for IntelliJ IDEA Plugin development, when you don’t know how to implement the feature, looking other module’s source code helps you understanding.

IntelliJ IDEA community edition source code is open at github, and you can see the “teacher” implementation. Just for one example, in the IntelliJ IDEA setting you can find “Terminal” configuration in Tools tab. This terminal implementation can be found under \intellij-community\plugins\terminal\src\org\jetbrains\plugins\terminal. 

By looking working other source code, you can get the idea for your implementation more easily.

Source code reading of waifu2x

Memo for self study.

SRCNN – Super resolution by deep convolutional neural network

Recently many application is developed using deep learning. waifu2x is a image super resolution application using convolutional neural network.

Cite from waifu2x

The source code is open at github. It is developed using torch7, so the Lua programming language is used. I have never used Lua, but it is similar to python, so reading Lua source code was not so difficult without further study. 

waifu2x supports upscaling (“scale”) and noise reduction (“noise”), but I will focus on scaling function here. 
* Actually same CNN network architecture is used for upscaling, and noise reduction, they work in same way. Main difference is only training set used during training. 

Theory of super resolution using convolutional neural network (SRCNN) is first introduced in below paper

Model

The Convolutional neural network (CNN) model is defined at waifu2x/lib/srcnn.lua

   local model = nn.Sequential()
   model:add(nn.SpatialConvolutionMM(ch, 32, 3, 3, 1, 1, 0, 0))
   model:add(w2nn.LeakyReLU(0.1))
   model:add(nn.SpatialConvolutionMM(32, 32, 3, 3, 1, 1, 0, 0))
   model:add(w2nn.LeakyReLU(0.1))
   model:add(nn.SpatialConvolutionMM(32, 64, 3, 3, 1, 1, 0, 0))
   model:add(w2nn.LeakyReLU(0.1))
   model:add(nn.SpatialConvolutionMM(64, 64, 3, 3, 1, 1, 0, 0))
   model:add(w2nn.LeakyReLU(0.1))
   model:add(nn.SpatialConvolutionMM(64, 128, 3, 3, 1, 1, 0, 0))
   model:add(w2nn.LeakyReLU(0.1))
   model:add(nn.SpatialConvolutionMM(128, 128, 3, 3, 1, 1, 0, 0))
   model:add(w2nn.LeakyReLU(0.1))
   model:add(nn.SpatialConvolutionMM(128, ch, 3, 3, 1, 1, 0, 0))
   model:add(nn.View(-1):setNumInputDims(3))
waifu2x/lib/srcnn.lua

where ch is a input/output channel number, ch = 1 when you train only Y channel of YCbCr image, and ch = 3 can be used when RGB image is trained.

So basically it is composed of 7 depth of convolutioal layer with LeakyReLU activation. LeakyReLU is also called PReLU, Parametric Rectified Linear Unit.

Image converting process

Next, let’s see how to preprocess, model forward propagate, postprocessing image is going on. The main process of image converting is written in waifu2x.lua,  but its main point is 

local function convert_image(opt)
   local x, alpha = image_loader.load_float(opt.i)
   ...
   scale_f = reconstruct.scale
   ...
   new_x = scale_f(model, opt.scale, x, opt.crop_size)
   ...
   image_loader.save_png(opt.o, new_x, opt.depth, true)
   ...
end

so main processing is done at reconstruct.scale function at /lib/reconstruct.lua 

function reconstruct.scale(model, scale, x, block_size)
      ...
      x = reconstruct.scale_y(model, scale, x,
			      reconstruct.offset_size(model), block_size)

x, image array is just passed to scale_y function

function reconstruct.scale_y(model, scale, x, offset, block_size)
   block_size = block_size or 128
   local x_lanczos = iproc.scale(x, x:size(3) * scale, x:size(2) * scale, "Lanczos")
   x = iproc.scale(x, x:size(3) * scale, x:size(2) * scale, "Box")
   if x:size(2) * x:size(3) > 2048*2048 then
      collectgarbage()
   end
   local output_size = block_size - offset * 2
   local h_blocks = math.floor(x:size(2) / output_size) +
      ((x:size(2) % output_size == 0 and 0) or 1)
   local w_blocks = math.floor(x:size(3) / output_size) +
      ((x:size(3) % output_size == 0 and 0) or 1)
   
   local h = offset + h_blocks * output_size + offset
   local w = offset + w_blocks * output_size + offset
   local pad_h1 = offset
   local pad_w1 = offset
   local pad_h2 = (h - offset) - x:size(2)
   local pad_w2 = (w - offset) - x:size(3)
   x = image.rgb2yuv(iproc.padding(x, pad_w1, pad_w2, pad_h1, pad_h2))
   x_lanczos = image.rgb2yuv(iproc.padding(x_lanczos, pad_w1, pad_w2, pad_h1, pad_h2))
   local y = reconstruct_y(model, x[1], offset, block_size)
   y[torch.lt(y, 0)] = 0
   y[torch.gt(y, 1)] = 1
   x_lanczos[1]:copy(y)
   local output = image.yuv2rgb(iproc.crop(x_lanczos,
					   pad_w1, pad_h1,
					   x_lanczos:size(3) - pad_w2, x_lanczos:size(2) - pad_h2))
   output[torch.lt(output, 0)] = 0
   output[torch.gt(output, 1)] = 1
   x = nil
   x_lanczos = nil
   y = nil
   collectgarbage()
   
   return output

We will separate 3 parts here, splitted at the line 22, reconstruct_y(model, x[1], offset, block_size)

  • Preprocessing: preparation of input for the model, 
  • Model forwarding: input x to the CNN model and get output y, it is done at reconstruct_y(model, x[1], offset, block_size)
  • Postprocessing: some postprocess to convert obtained output y to image. 

Preprocess

We will input only Y channel to the model, and the size of the image is already scaled before inputting to the model, 

Important part is 

1. Upscaling x using nearest neighbor method, 

x = iproc.scale(x, x:size(3) * scale, x:size(2) * scale, "Box")

2. Convert image from RGB to YUV, and input only Y channel (x[1]) to the model

x = image.rgb2yuv(iproc.padding(x, pad_w1, pad_w2, pad_h1, pad_h2))
...
local y = reconstruct_y(model, x[1], offset, block_size)

Model forwarding

It is done in reconstruct_y function

local function reconstruct_y(model, x, offset, block_size)
   if x:dim() == 2 then
      x = x:reshape(1, x:size(1), x:size(2))
   end
   local new_x = torch.Tensor():resizeAs(x):zero()
   local output_size = block_size - offset * 2
   local input = torch.CudaTensor(1, 1, block_size, block_size)
   
   for i = 1, x:size(2), output_size do
      for j = 1, x:size(3), output_size do
	 if i + block_size - 1 <= x:size(2) and j + block_size - 1 <= x:size(3) then
	    local index = {{},
			   {i, i + block_size - 1},
			   {j, j + block_size - 1}}
	    input:copy(x[index])
	    local output = model:forward(input):view(1, output_size, output_size)
	    local output_index = {{},
				  {i + offset, offset + i + output_size - 1},
				  {offset + j, offset + j + output_size - 1}}
	    new_x[output_index]:copy(output)
	 end
      end
   end
   return new_x
end

input x and getting output new_x by using model:forward

Postprocess

1. Normalization: clipping calculated output y between 0 – 1.

the input image x was normalized, and its range is 0 – 1, but model may output the value outside this range. It is clipped by

   y[torch.lt(y, 0)] = 0
   y[torch.gt(y, 1)] = 1

2. Merging x_lanchos (UV channel) and y (Y channel)

waifu2x only upscales Y channel using SRCNN, and UV channel upscaling is done by conventional Lanchos method. 

x_lanczos[1]:copy(y)

3. Revert from YUV to RGB

   local output = image.yuv2rgb(iproc.crop(x_lanczos,
					   pad_w1, pad_h1,
					   x_lanczos:size(3) - pad_w2, x_lanczos:size(2) - pad_h2))

Training 

  • ADAM is used for MSGD parameter tuning.
  • Huber loss is used for loss function

loss function

See lib/CrippedWeightedHuberCriterion.lua

  • clipped: clipping input 0 – 1, to compare with the target data.
  • weighted: weight used for calculating loss for each channel (RGB), but it is not important for only Y channel training. 
  • Huber loss: compared to MSE (minimum squared error), it is less sensitive to outliers.
    ref: wikipedia

Install Android phone’s app on Android TV via Wifi

As far as I know, this is one of the most convenient method to transfer files between Android devices and transfer & install Android apps in apk format. If you want to transfer by using USB, not by Wifi see old post “Install Android phone’s application to Android TV“.

Sideloading apps on Android TV

Many of the Android phone/tablet’s apps are not on the Google play store on Android TV (Nexus Player, Sony BRAVIA Android TV, NVIDIA Shield etc…).

Many famous Android phone app is not correspond to Android TV yet, for example

  • Browser app: Chrome, Firefox, Opera, UC Browser…
  • SNS app: Facebook, Twitter, What’s app, …
  • System/performance app: Antutu, CPU 

However they are working on same “Android” platform and we can sideload these Android apps.

* But of course, functionality of these sideloaded app is not supported.

When referring to Androidapps, “sideloading” typically means installing an application package in APK format onto an Android device.
from Wikipedia

.apk is a file format for Android apps. You can extract .apk file from installed apps using “ES file explorer“.

Install Android phone’s app on Android TV via Wifi

ES file explorer have Net Manager feature, and we can transfer Android phone’s app to Android TV.

I will write an example to install Android phone’s Chrome browser app onto Android TV (Officially, many of the browser is not supported by Android TV yet). This is an example from phone to TV. But transferring Android app, is available from any Android device to any Android device.

Prerequisite

  • You have Android phone and Android TV device.
  • Both devices can be connected to same network (LAN, Wifi)

If both devices cannot be connected in same network, see Install Android phone’s application to Android TV for alternative method to use USB file for apk transfer.

Receiver side (Android TV): preparation of Net Manager

Receiver side preparation.

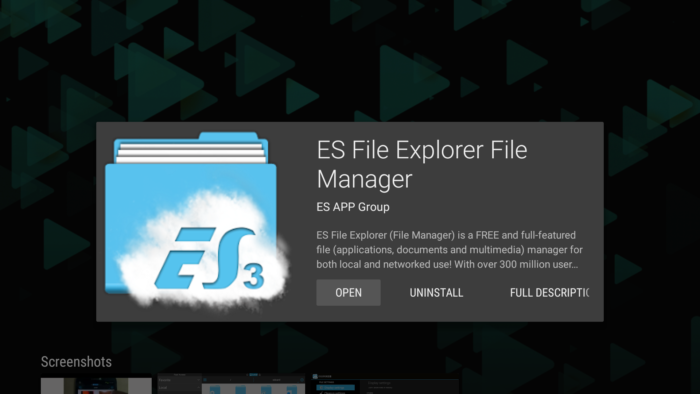
1. Install ES File Explorer File Manager

You can find it on Google play store.

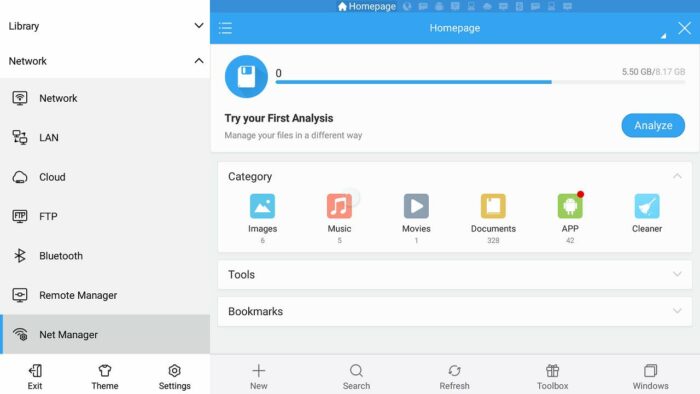
2. Launch ES file explorer, and select Net Manager Tab

At the Homepage view, you can find Net Manager tab in Network category.

3. Confirm network condition on Net Manager

On Net Manager, if you can see “You have joined a network, SSID is your-wifi-spot-name” the receiver side condition is ok. Keep this display and go to Sender side setting. 

Sender side (Android phone): send Android app 

1. Connect device to the same network with receiver side.

2. Launch App Manager

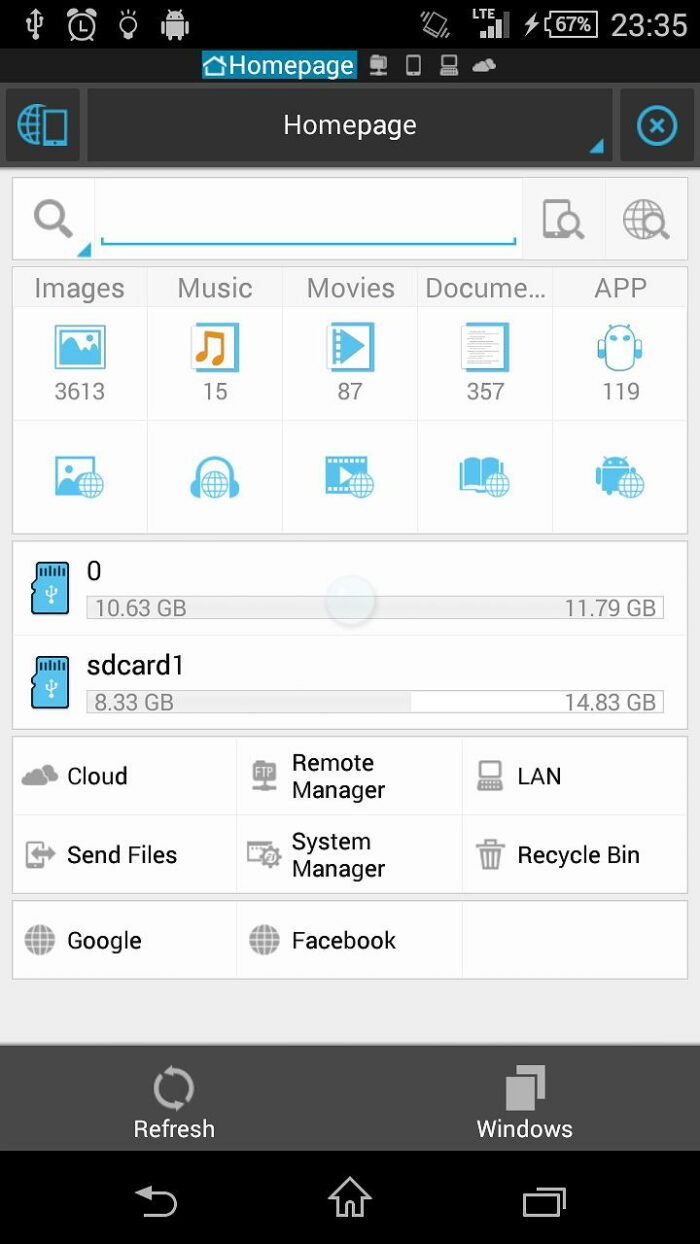
At Homepage tab, click top right icon with text “APP”. 

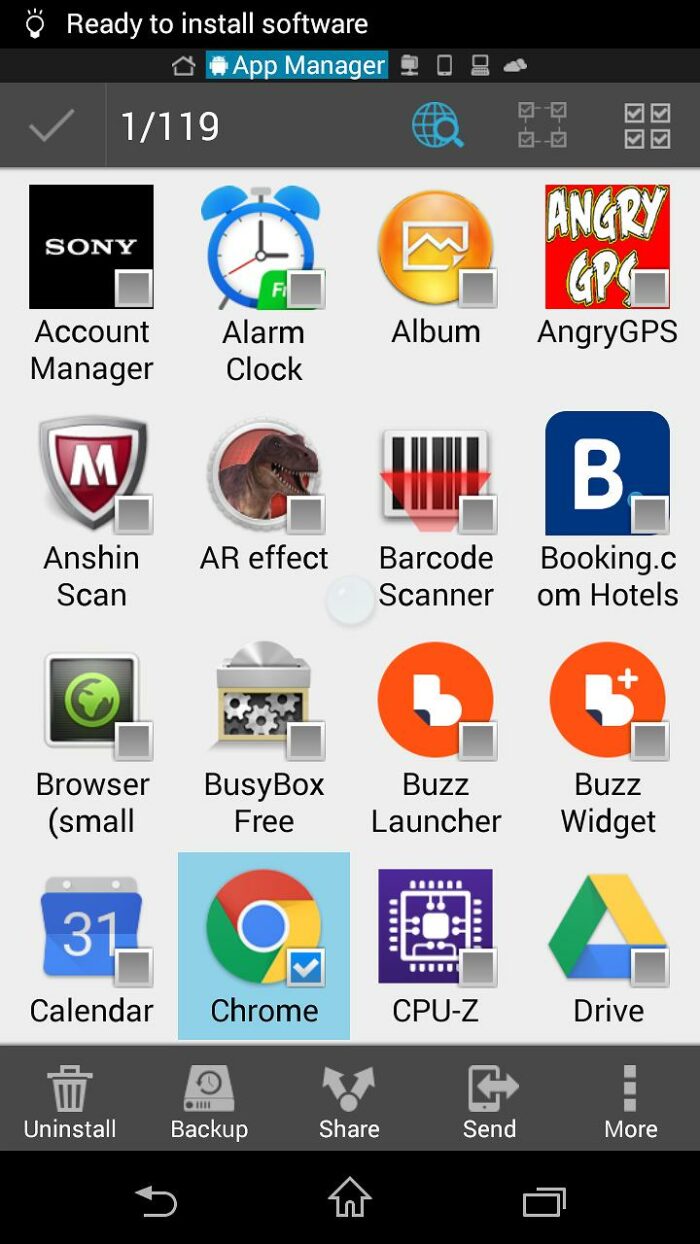
3. Long press app you want to transfer

App Manager shows the list of installed apps on your device. Select and long press (touch) apps that you want to sideload on Android TV (In this case, I will send Chrome app to Sony BRAVIA Android TV).

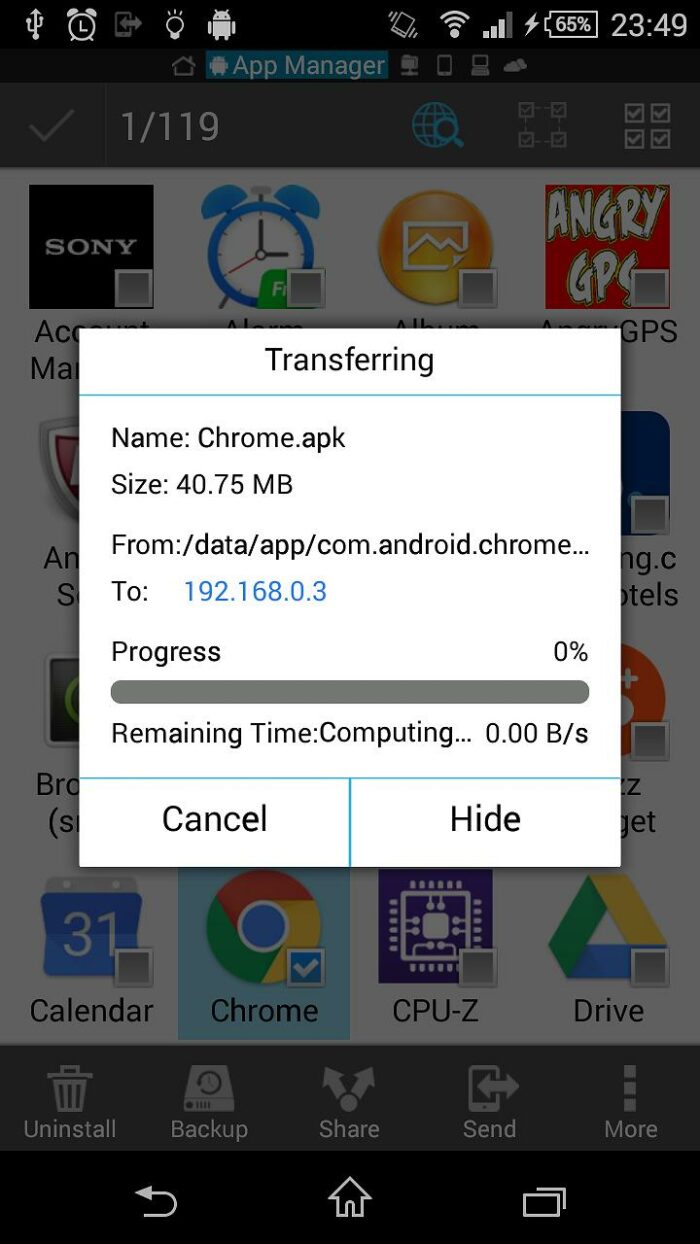
After selected, press “send” icon on left-bottom. 

You can actually transfer any file (not only apk) to receiver side!!

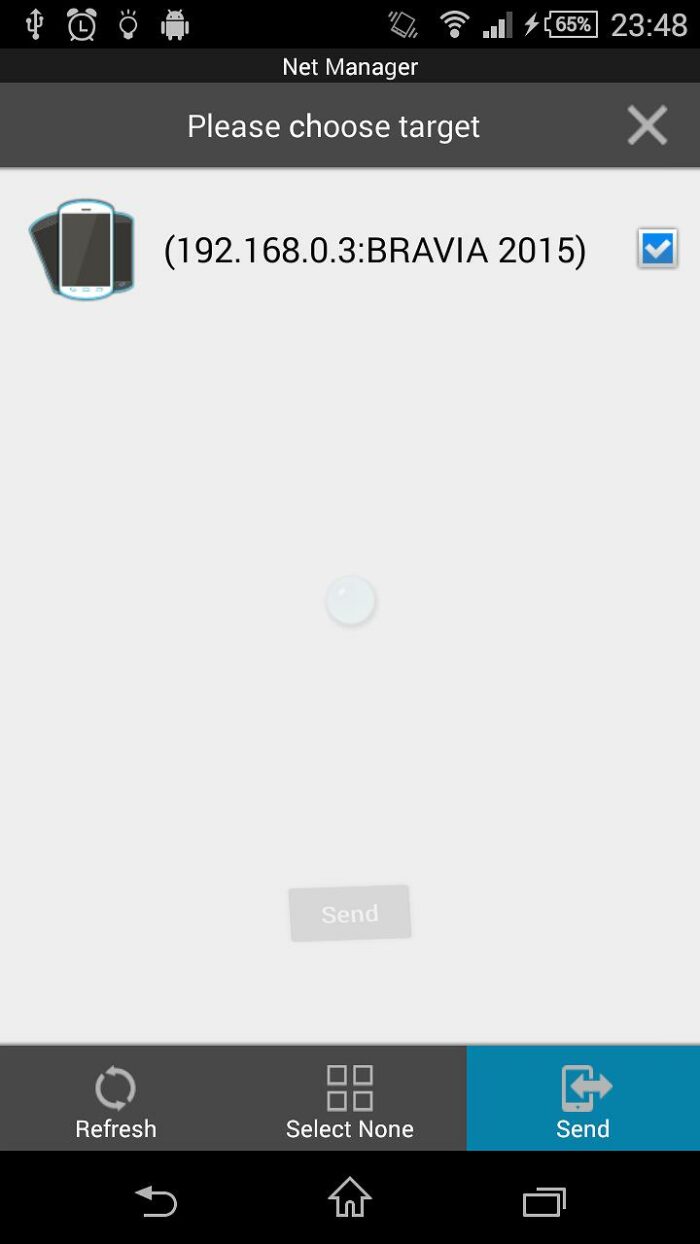
4. Select device to send to

It will start scanning to find same network device, and shows on the list once found. After selecting target device to send to, you can press “send” icon button to send apk file.

After confirming on receiver side (see below), ES file explorer starts to send app to target device.


Receiver side (Android TV): receive apk file and install 

Receive file

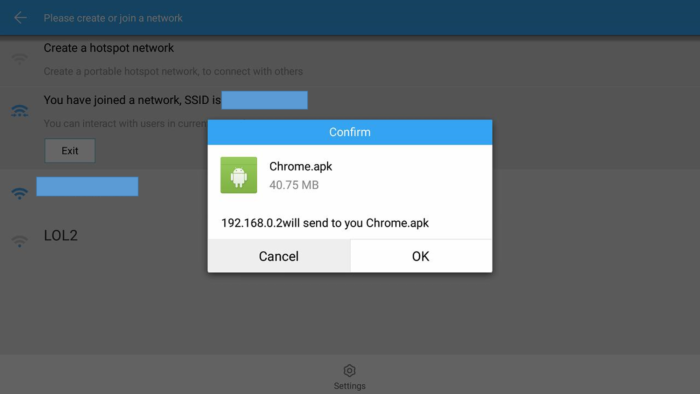
1. Now confirmation display appears. Press OK to proceed.

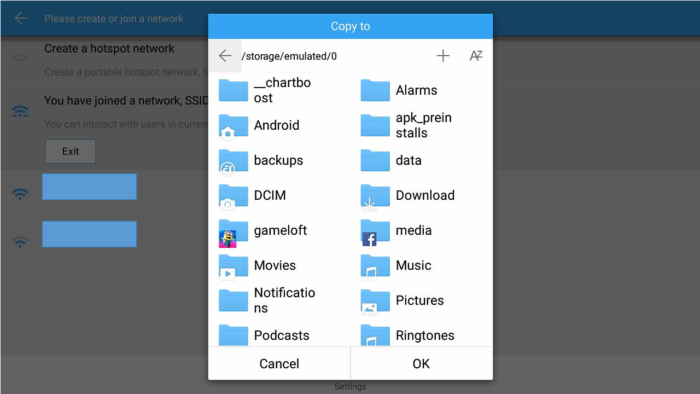
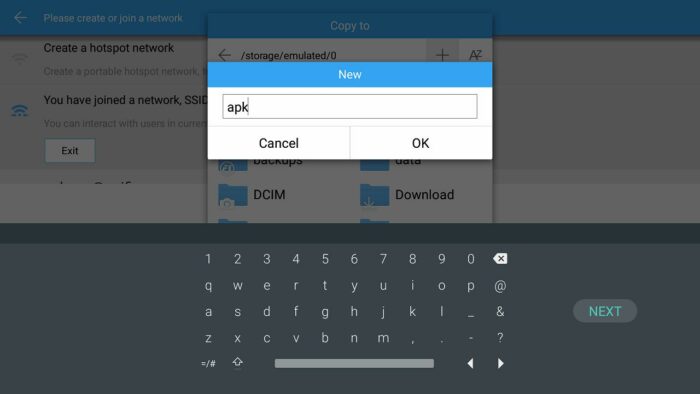
2. Choose folder to copy receiving files.

You can also create new folder for the destination.

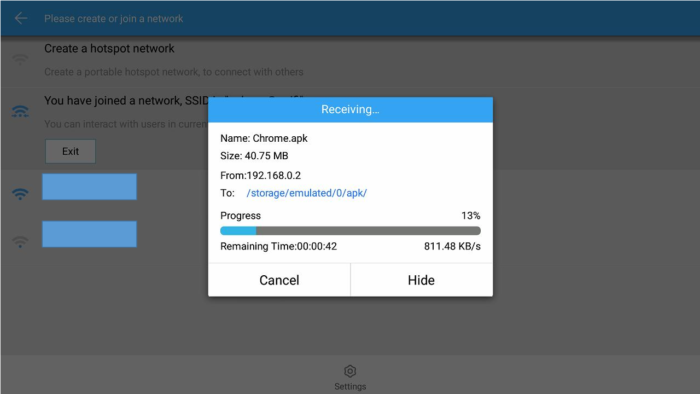
3. Receive files

Now ES file explorer sends file from sender(phone) to receiver(TV).

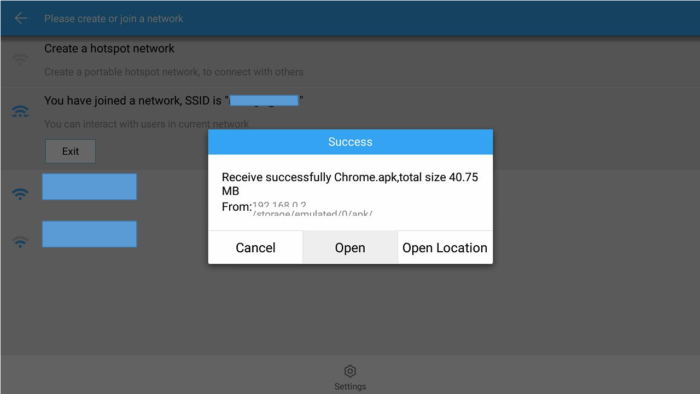
4. Receive done!

If you are transferring photos, music files transfer is done. 

If you are transferring Android app, we can proceed to install this apk file, click “Open” to install.

Install apk

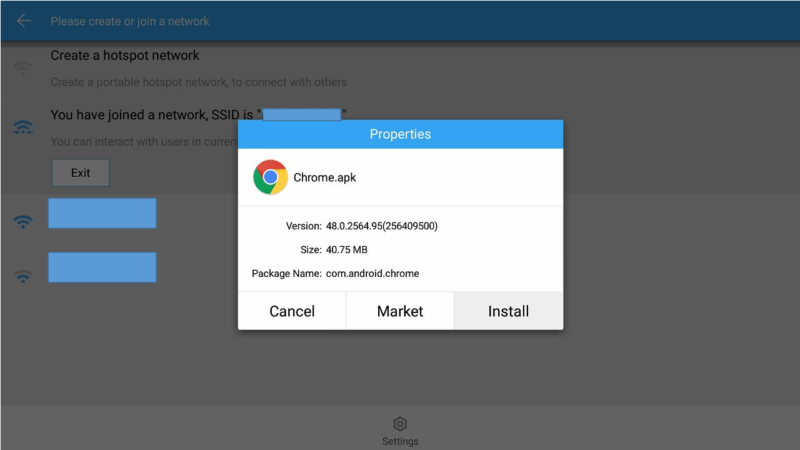
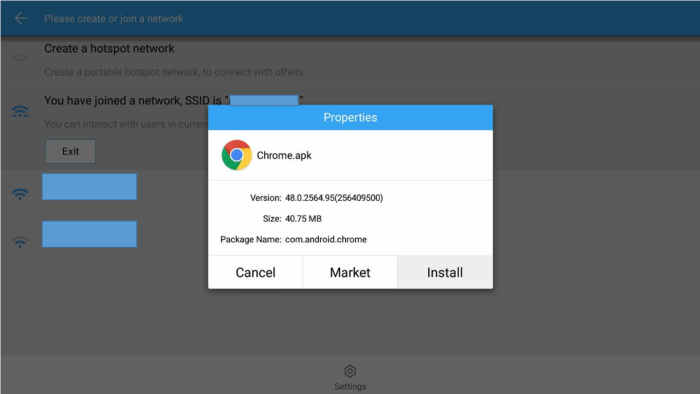
5. Install apk file

After open apk file, ES File Explorer shows the option for this apk. Press “Install”

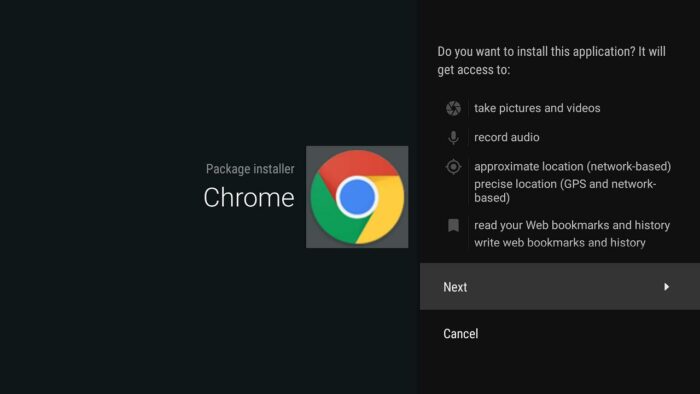
6. Follow/Agree requirements to finish install

7. Install done!

Enjoy exploring more possibility of Android TV by trying many other existing Android phone’s apps.

Launch sideloaded apps on Android TV

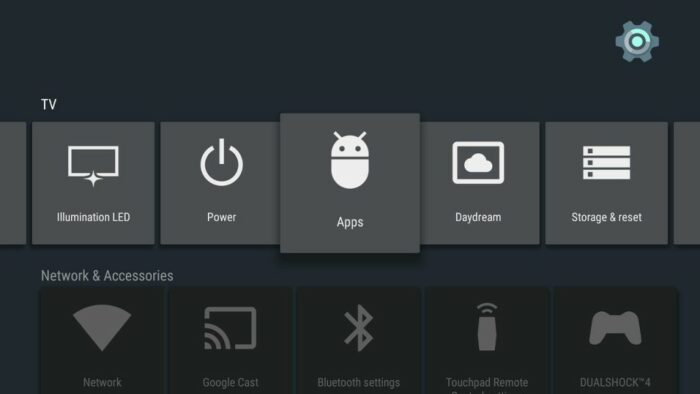
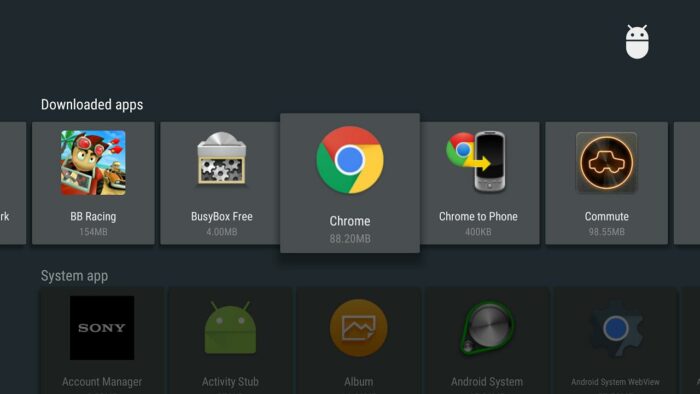
Android phone apps are not accessible from default home screen (Leanback Launcher), you can find these apps via [Settings] → [Apps] → [Downloaded apps]

Or you can install other Android TV home launcher app like Sideload launcher, or HALaucher.

See also: Recent update of LeanbackLauncher Home app

Netflix sign up procedure on Android TV

Sign up procedure

I signed up Netflix with a 1-month free trial using Sony BRAVIA Android TV. Below is a procedure.

* This post is written at 2016 March. The procedure might change in the future.

You need a credit card even signing up free trial.

First welcome page: price is shown in ringgit because I registered in Malaysia.

Step 1: Register

  • Name
  • E-mail Address
  • Password

E-mail subscription setting

Step 2: Choose your plan

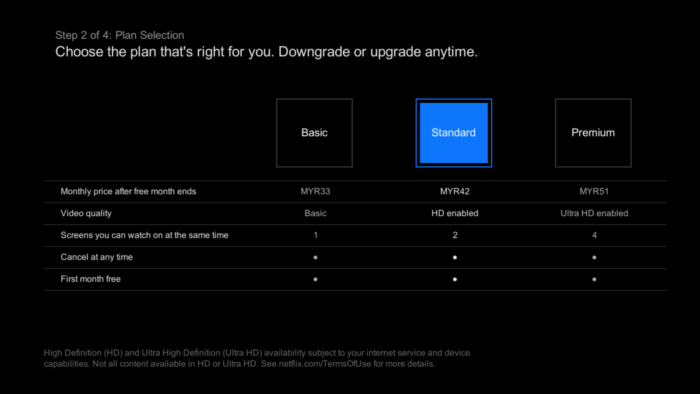
There seems to be 3 plans, “Basic“, “Standard” and “Premium“.

The big difference is the video quality (you cannot enjoy Full HD with Basic plan) and how many screens you can watch at the same time.

Step 3: Payment setting. Register your  (Credit card number)

Step 4: Agree terms and conditions.

Sign up done! But you still need to go a little bit of setting.

Account setting: we can manage a profile for Netflix (I think this affects to recommendation for your main page video list)

Choose favorite 3 videos. This will create first your preference, which affects the recommendation shown on the main page.

All set up done! See Try Netflix on Android TV for check look and feel of Netflix on Android TV. 

Try Netflix on Android TV

Netflix

No need to explain, Netflix is most famous streaming movie & TV series provider, and now there’s more than 75 million subscribers (Wikipedia). For movie lovers, it is a must have service so that you can enjoy unlimited movie at home with flat-rate!

Netflix is available with Android TV devices (such as Nexus Player, recent Sony BRAVIA TV etc.), and below are some screen shots to introduce. 

Main page: Many popular movies and TV series are listed. I feel that Netflix is fully utilizing “recommendation” to show personalized video lists. For example, you can see recommended video lists based on the video you watched before.

I guess it is because “searching by text” is usually troublesome for TV, and they are focusing on recommendation. 

Search page: Of course, you can either search movies by text or categories too.

Movie/TV introduction page:

You can see description of the video, and you can change settings of Audio and Subtitles here too. 

Audio and Subtitle setting:

For Audio, you can enjoy movie with dynamic 5.1 ch if you have home theater system.

Subtitle is also available, it is good for me like a non-native English speaker to enjoy English movie!

If you are interested in signing up Netflix, see Netflix sign up procedure on Android TV for set up procedure.

Procedure for multi-language support for WordPress by building multisite

I started this blog in English, but I’m Japanese and I sometimes want to write some post in Japanese. I added Multi-Language support for this WordPress by using multisite feature which is supported by default WordPress feature. Now Original English site and newly created Japanese site are running on my WordPress.

How to support multi-language in WordPress

There are several ways to support multi language in WordPress. Roughly, 4 methods are available and you need to choose best solution based on your requirement and situation.

  1. Install independent WordPress on different server in each country
    For each language to support, prepare host server in each country and make independent WordPress site.
    Pros:It is an ideal method for Network traffic.
    Cons:You need money and man-power to manage each server.
  2. Multisite (This site adopts this)
    We can build multisite in 1 server, 1 WordPress, by using multisite feature supported by WordPress. And each site can be assigned to each language’s site.
    We can use following plugins to link each language’s pagePros:We can manage multisite in 1 server. But each site is independent, so you can customize/optimize the design for each language’s site.
    Cons:Setup (Theme, plugins, Categories etc) is necessary for each site. It takes time.
  3. Install Multi language plugins
    If you want to extend some feature in WordPress, you may consider installing plugins. some multi language plugins are also available, for example
    WPMLqTranslate XBogoPolylang
    Each plugins are working its own algorithm to link each translation post. So it seems that usually each plugins are not compatible with others.
    Pros:Installing plugin is easy
    Cons:When you make multi language posts in one site by using these plugins, it makes some restriction for future extension. Concretely, if you want to change plugin in future, you may have no compatible other plugin in choice.
  4. Use 1 WordPress site without plugin
    It’s the most simple way, just write post in each language in 1 WordPress. If you are personal blogger, then this solution is the easiest way.
    Pros:No new setting necessary.
    Cons:It is difficult to manage your site by each language.

More top solution needs cost, but you can manage sites/posts in each language. I was thinking to adopt solution 3 at first, but when I consider about future extension, it has a concern that it is difficult to change to other plugins. So I adopted 2. “building multisite”.

This time, I will explain the case that one WordPress site was already running and adding new site. Procedure is following

  1. Back up data
  2. Sub domain setting
  3. Enable WordPress multisite feature
  4. Adding new site
  5. Install/setting Multi Language Switcher plugin
  6. Theme, plugin setting on new site

The process is long compared to just installing a plugin in WordPress.

If you are building new WordPress site, ready to run package is available from BitNami.

Ref (Japanese):

Backup data

Backup WordPress directory, and database. Copy WordPress files from server to local environment and export WordPress database from server.It is better to backup data before begin because you are going to modify wp-config.php and .htaccess files.Note: Enable multisite in WordPress creates new table on Database, and it does not change existing table. So I guess the risk of trouble is not high. 

Sub domain setting

Main topic starts from here. Refer Before You Create A Network for official web site.

There are 2 methods to create multisite in WordPress

  • Sub domain type:Mange each site by sub domain, e.g. site1.example.com, site2.example.com
  • Sub directory type:Manage each site by path, e.g. example.com/site1, example.com/site2

This time I use sub domain type, jp.corochann.com will be used in new site. At first, jp.corochann.com must be linked with existing WordPress. Multisite is handled in same WordPress folder, and eachsite (http://corochann.com and http://jp.corochann.com) can be linked to same WordPress directory. Configure DNS so that jp.corochann.com refers the same place with corochann.com.

This configuration depends on your domain service & web hosting server. Picture below shows my setting in my rental server. After setting done, it is success if you can see the same page with original page by accessing the sub domain URL (Accessing jp.corochann.com returns the same results with corochann.com)

Enable WordPress multisite feature

Refer Create A Network (日本語訳)  for official page.

Enable multisite

Default setting of WordPress disables multisite. Modify wp-config.php file to enable it. Insert below on top of /* That's all, stop editing! Happy blogging. */.

/* Multisite */
define( 'WP_ALLOW_MULTISITE', true );

After editted, go back to dashboard of your WordPress and reload browser. Network setting is now added to Tools tab.

Use multisite feature

Before going to Network setup, Deactivate all the plugins. Go to Network setting and press install after writing network title and E-mail.

Network setting, cite from official page

When you are already using existing WordPress, then it seems only sub domain type is available. 

Follow the instruction, insert following in wp-config.php (The code is different, depending in your environment)

define('MULTISITE', true);
define('SUBDOMAIN_INSTALL', true);
define('DOMAIN_CURRENT_SITE', 'corochann.com');
define('PATH_CURRENT_SITE', '/');
define('SITE_ID_CURRENT_SITE', 1);
define('BLOG_ID_CURRENT_SITE', 1);

By the way, be careful that the term define( 'WP_ALLOW_MULTISITE', true ); and define( 'MULTISITE', true ); is different.

Next, modify .htaccess which is located at same hierarchy of wp-config.php

RewriteEngine On
RewriteBase /
RewriteRule ^index\.php$ - [L]

# add a trailing slash to /wp-admin
RewriteRule ^wp-admin$ wp-admin/ [R=301,L]

RewriteCond %{REQUEST_FILENAME} -f [OR]
RewriteCond %{REQUEST_FILENAME} -d
RewriteRule ^ - [L]
RewriteRule ^(wp-(content|admin|includes).*) $1 [L]
RewriteRule ^(.*\.php)$ $1 [L]
RewriteRule . index.php [L]

After edit, reload browser and log-in again. As you can see in above picture, “My Sites” is added at the top of dashboard if install was successful.

If you fail and WordPress shows error, you can revert wp-config.php. 

Add new site and assign to sub domain

Pre-setup is done, let’s add new site and assign this site to sub domain jp.corochann.com.

On the top of Dashboard, select My Sites > Network Admin > Sites. 

Press “Add New” button on top to add new site.

We can specify sub domain here to link new site.

After this setup, accessing sub domain (http://jp.corochann.com) shows the newly added site, which is differenct from original site (http://corochann.com

Introduce Multi Language Switcher

Multisite Language Switcher is a WordPress plugin, which supports to link several multisite via language. See also Multisite Language Switcher Install, config & use for official install & setup guide.

Official site

For install

Site language setting

Before activating plugin, make sure your Site language setting at dashboard. For each site, set proper language by accessing General > Site Language at dashboard. 

Plugin install, setup

Installing plugin is available from Network Admin page, not by individual site page. Go to My Sites > Network Admin > Dashboard, and install plugin for whole multisite. Multi Language Switcher can be searched & installed in usual way of installing plugin, Dashboard > Plugins > Add New 

Plugin must be Activated in each site. Configuration can be changed at Dashboard Settings > Multi Language Switcher.

English site setting
Japanese site setting

Place a widget at Theme customize

Language switch button don’t appear when only plugin is Activated. Go to Appearance > Customize to add Multi Language Switcher widget.

This is an example where Flag and description is shown in the widget.

Link translated post for each post

Translate page between English site (http://corochann.com) and Japanese site (http://jp.corochann.com) can be linked manually for each post. (If you have no translation post, it is ok just no need to link.)

For edit post page, new field is created at top right by multi language switcher to link each posts in each site via langualge. 

That’s all for Multi Language Switcher setting.

Theme, plugin setting etc for new site

Finally, many configuration is necessary for new site since it is still default setting. To start with, below items should be setup based on your original page.

  • Apply Theme
  • Each plugin Activate, setting
  • Theme customize
  • Permalinks setting

Writing this post takes long time than I thought…