Memo for self study.
Contents
SRCNN – Super resolution by deep convolutional neural network
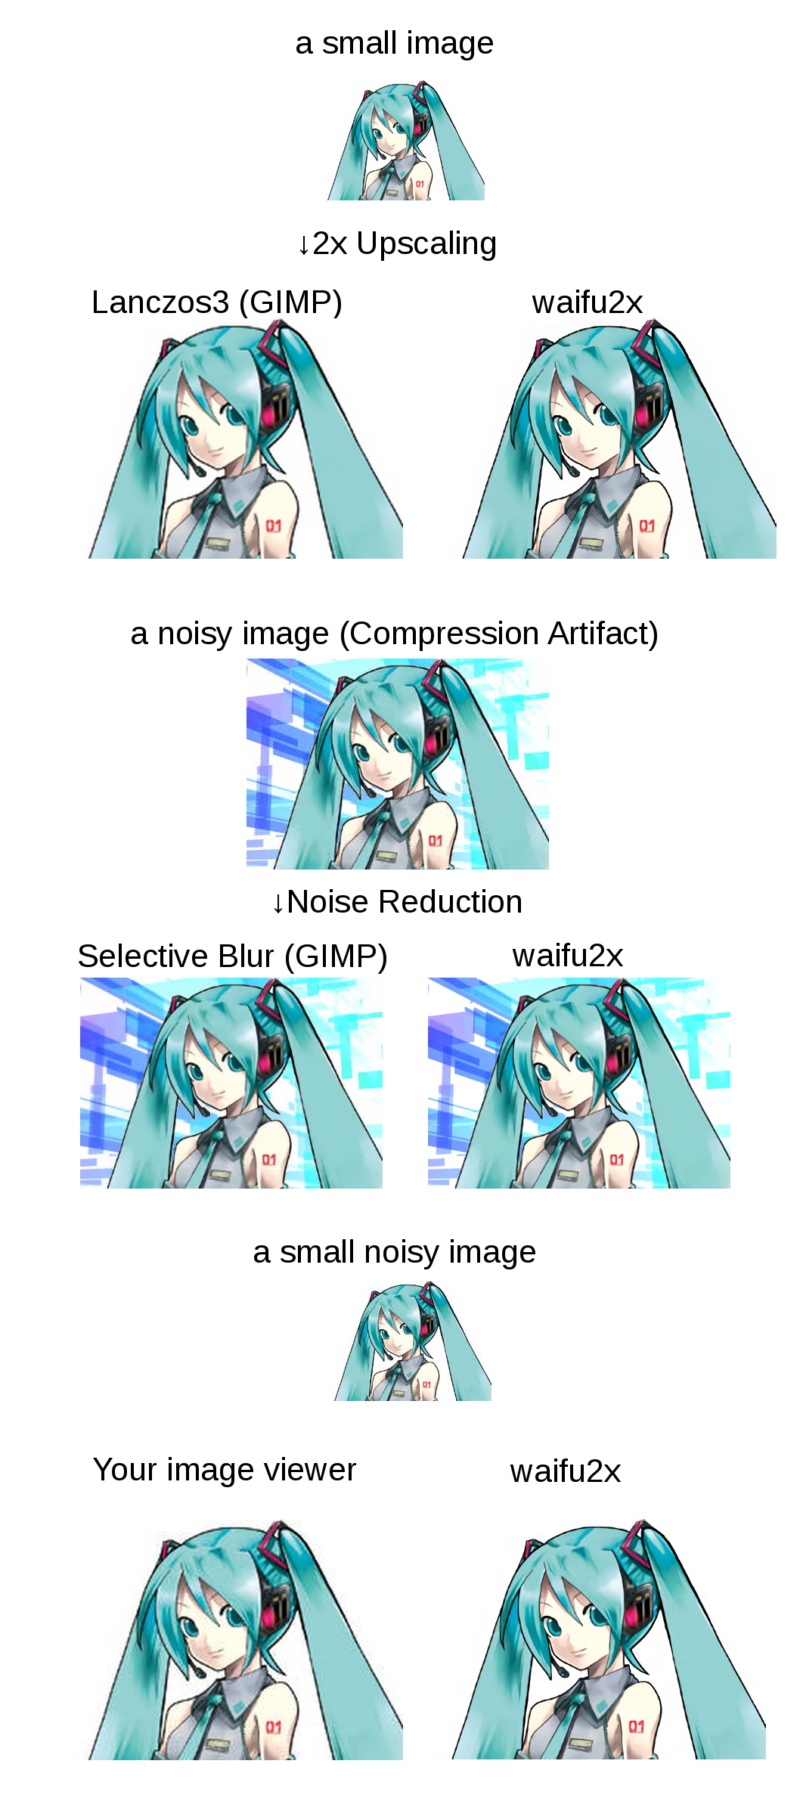
Recently many application is developed using deep learning. waifu2x is a image super resolution application using convolutional neural network.

The source code is open at github. It is developed using torch7, so the Lua programming language is used. I have never used Lua, but it is similar to python, so reading Lua source code was not so difficult without further study.
waifu2x supports upscaling (“scale”) and noise reduction (“noise”), but I will focus on scaling function here.
* Actually same CNN network architecture is used for upscaling, and noise reduction, they work in same way. Main difference is only training set used during training.
Theory of super resolution using convolutional neural network (SRCNN) is first introduced in below paper
Model
The Convolutional neural network (CNN) model is defined at waifu2x/lib/srcnn.lua
   local model = nn.Sequential()
   model:add(nn.SpatialConvolutionMM(ch, 32, 3, 3, 1, 1, 0, 0))
   model:add(w2nn.LeakyReLU(0.1))
   model:add(nn.SpatialConvolutionMM(32, 32, 3, 3, 1, 1, 0, 0))
   model:add(w2nn.LeakyReLU(0.1))
   model:add(nn.SpatialConvolutionMM(32, 64, 3, 3, 1, 1, 0, 0))
   model:add(w2nn.LeakyReLU(0.1))
   model:add(nn.SpatialConvolutionMM(64, 64, 3, 3, 1, 1, 0, 0))
   model:add(w2nn.LeakyReLU(0.1))
   model:add(nn.SpatialConvolutionMM(64, 128, 3, 3, 1, 1, 0, 0))
   model:add(w2nn.LeakyReLU(0.1))
   model:add(nn.SpatialConvolutionMM(128, 128, 3, 3, 1, 1, 0, 0))
   model:add(w2nn.LeakyReLU(0.1))
   model:add(nn.SpatialConvolutionMM(128, ch, 3, 3, 1, 1, 0, 0))
   model:add(nn.View(-1):setNumInputDims(3))
waifu2x/lib/srcnn.lua
where ch is a input/output channel number, ch = 1 when you train only Y channel of YCbCr image, and ch = 3 can be used when RGB image is trained.
So basically it is composed of 7 depth of convolutioal layer with LeakyReLU activation. LeakyReLU is also called PReLU, Parametric Rectified Linear Unit.
Image converting process
Next, let’s see how to preprocess, model forward propagate, postprocessing image is going on. The main process of image converting is written in waifu2x.lua, but its main point is
local function convert_image(opt)
   local x, alpha = image_loader.load_float(opt.i)
   ...
   scale_f = reconstruct.scale
   ...
   new_x = scale_f(model, opt.scale, x, opt.crop_size)
   ...
   image_loader.save_png(opt.o, new_x, opt.depth, true)
   ...
end
so main processing is done at reconstruct.scale function at /lib/reconstruct.lua
function reconstruct.scale(model, scale, x, block_size)
      ...
      x = reconstruct.scale_y(model, scale, x,
			      reconstruct.offset_size(model), block_size)
x, image array is just passed to scale_y function
function reconstruct.scale_y(model, scale, x, offset, block_size)
   block_size = block_size or 128
   local x_lanczos = iproc.scale(x, x:size(3) * scale, x:size(2) * scale, "Lanczos")
   x = iproc.scale(x, x:size(3) * scale, x:size(2) * scale, "Box")
   if x:size(2) * x:size(3) > 2048*2048 then
      collectgarbage()
   end
   local output_size = block_size - offset * 2
   local h_blocks = math.floor(x:size(2) / output_size) +
      ((x:size(2) % output_size == 0 and 0) or 1)
   local w_blocks = math.floor(x:size(3) / output_size) +
      ((x:size(3) % output_size == 0 and 0) or 1)

   local h = offset + h_blocks * output_size + offset
   local w = offset + w_blocks * output_size + offset
   local pad_h1 = offset
   local pad_w1 = offset
   local pad_h2 = (h - offset) - x:size(2)
   local pad_w2 = (w - offset) - x:size(3)
   x = image.rgb2yuv(iproc.padding(x, pad_w1, pad_w2, pad_h1, pad_h2))
   x_lanczos = image.rgb2yuv(iproc.padding(x_lanczos, pad_w1, pad_w2, pad_h1, pad_h2))
   local y = reconstruct_y(model, x[1], offset, block_size)
   y[torch.lt(y, 0)] = 0
   y[torch.gt(y, 1)] = 1
   x_lanczos[1]:copy(y)
   local output = image.yuv2rgb(iproc.crop(x_lanczos,
					   pad_w1, pad_h1,
					   x_lanczos:size(3) - pad_w2, x_lanczos:size(2) - pad_h2))
   output[torch.lt(output, 0)] = 0
   output[torch.gt(output, 1)] = 1
   x = nil
   x_lanczos = nil
   y = nil
   collectgarbage()

   return output
We will separate 3 parts here, splitted at the line 22, reconstruct_y(model, x[1], offset, block_size)
- Preprocessing: preparation of input
xfor the model, - Model forwarding: input
xto the CNN model and get outputy, it is done atreconstruct_y(model, x[1], offset, block_size) - Postprocessing: some postprocess to convert obtained output
yto image.
Preprocess
We will input only Y channel to the model, and the size of the image is already scaled before inputting to the model,
Important part is
1. Upscaling x using nearest neighbor method,
x = iproc.scale(x, x:size(3) * scale, x:size(2) * scale, "Box")
2. Convert image from RGB to YUV, and input only Y channel (x[1]) to the model
x = image.rgb2yuv(iproc.padding(x, pad_w1, pad_w2, pad_h1, pad_h2))
...
local y = reconstruct_y(model, x[1], offset, block_size)
Model forwarding
It is done in reconstruct_y function
local function reconstruct_y(model, x, offset, block_size)
   if x:dim() == 2 then
      x = x:reshape(1, x:size(1), x:size(2))
   end
   local new_x = torch.Tensor():resizeAs(x):zero()
   local output_size = block_size - offset * 2
   local input = torch.CudaTensor(1, 1, block_size, block_size)

   for i = 1, x:size(2), output_size do
      for j = 1, x:size(3), output_size do
	 if i + block_size - 1 <= x:size(2) and j + block_size - 1 <= x:size(3) then
	    local index = {{},
			   {i, i + block_size - 1},
			   {j, j + block_size - 1}}
	    input:copy(x[index])
	    local output = model:forward(input):view(1, output_size, output_size)
	    local output_index = {{},
				  {i + offset, offset + i + output_size - 1},
				  {offset + j, offset + j + output_size - 1}}
	    new_x[output_index]:copy(output)
	 end
      end
   end
   return new_x
end
input x and getting output new_x by using model:forward
Postprocess
1. Normalization: clipping calculated output y between 0 – 1.
the input image x was normalized, and its range is 0 – 1, but model may output the value outside this range. It is clipped by
   y[torch.lt(y, 0)] = 0
   y[torch.gt(y, 1)] = 1
2. Merging x_lanchos (UV channel) and y (Y channel)
waifu2x only upscales Y channel using SRCNN, and UV channel upscaling is done by conventional Lanchos method.
x_lanczos[1]:copy(y)
3. Revert from YUV to RGB
   local output = image.yuv2rgb(iproc.crop(x_lanczos,
					   pad_w1, pad_h1,
					   x_lanczos:size(3) - pad_w2, x_lanczos:size(2) - pad_h2))
Training
- ADAM is used for MSGD parameter tuning.
- Huber loss is used for loss function
loss function
See lib/CrippedWeightedHuberCriterion.lua
- clipped: clipping input 0 – 1, to compare with the target data.
- weighted: weight used for calculating loss for each channel (RGB), but it is not important for only Y channel training.
- Huber loss: compared to MSE (minimum squared error), it is less sensitive to outliers.
ref: wikipedia