We already learned how to write training code in chainer, the last task is to use this trained model to inference (predict) the test input MNIST image.
Inference code structure usually becomes as follows,
- Prepare input data
- Instantiate the trained model
- Load the trained model
- Feed input data into loaded model to get inference result
You have already learned the necessary stuff, and it is easy. See inference_mnist.py for the source code.
Contents
Prepare input data
For MNIST, it is easy in one line
    # Load the MNIST dataset
    train, test = chainer.datasets.get_mnist()
Instantiate the trained model and load the model
    # Load trained model
    model = mlp.MLP(args.unit, 10)
    if args.gpu >= 0:
        chainer.cuda.get_device(args.gpu).use()  # Make a specified GPU current
        model.to_gpu()  # Copy the model to the GPU
    xp = np if args.gpu < 0 else cuda.cupy

    serializers.load_npz(args.modelpath, model)
Here, note that model can be loaded after instantiating the model. This model must have the same structure (hidden unit size, layer depth etc) when you saved the model in training stage.
Feed input data into loaded model to get inference result
Below code is to get inference result y from test input data x.
    for i in range(len(test)):
        x = Variable(xp.asarray([test[i][0]]))    # test data
        # t = Variable(xp.asarray([test[i][1]]))  # labels
        y = model(x)                              # Inference result
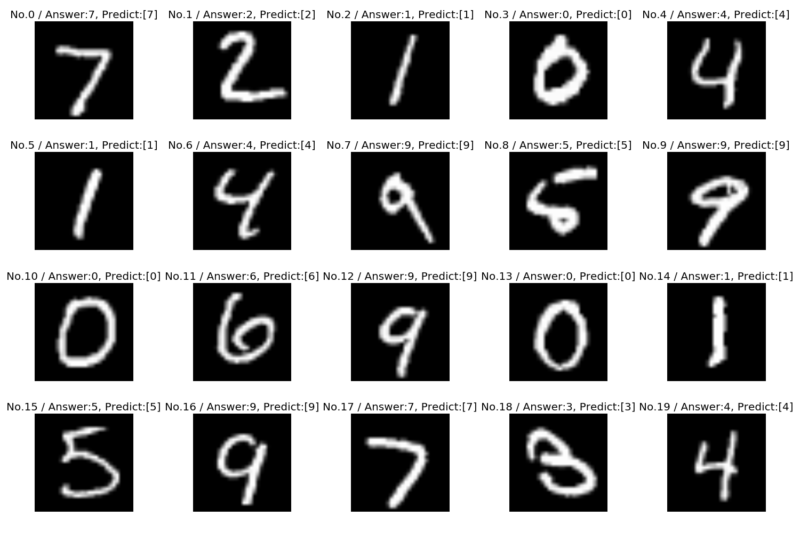
Visualize the result
You might want to see the inference result together with the input image to understand more precisely. This code draws a plot for test input image and its inference result.
    """Original code referenced from https://github.com/hido/chainer-handson"""
    ROW = 4
    COLUMN = 5
    # show graphical results of first 20 data to understand what's going on in inference stage
    plt.figure(figsize=(15, 10))
    for i in range(ROW * COLUMN):
        # Example of predicting the test input one by one.
        x = Variable(xp.asarray([test[i][0]]))  # test data
        # t = Variable(xp.asarray([test[i][1]]))  # labels
        y = model(x)
        np.set_printoptions(precision=2, suppress=True)
        print('{}-th image: answer = {}, predict = {}'.format(i, test[i][1], F.softmax(y).data))
        prediction = y.data.argmax(axis=1)
        example = (test[i][0] * 255).astype(np.int32).reshape(28, 28)
        plt.subplot(ROW, COLUMN, i+1)
        plt.imshow(example, cmap='gray')
        plt.title("No.{0} / Answer:{1}, Predict:{2}".format(i, test[i][1], prediction))
        plt.axis("off")
    plt.tight_layout()
    plt.savefig('inference.png')
Even only 50 hidden units are used, the accuracy to inference the MNIST digit number is quite high.

That’s all for MNIST dataset tutorial. Now you have learned the basics of how to use deep learning framework. how to write training code, how to write inference code with Chainer. It is now ready to go further to specialized category. Convolutional Neural Network is used in wide area especially Image processing, Reccurent Neural Network is Language processing etc.