
This tutorial corresponds to 03_custom_dataset_mlp folder in the source code.
We have trained the model with own dataset, MyDataset, in previous post, let’s write predict code.
Source code:
Contents
Prepare test data
It is not difficult for the model to fit to the train data, so we will check how the model is fit to the test data.
    # Load the custom dataset
    dataset = MyDataset('data/my_data.csv')
    train_ratio = 0.7
    train_size = int(len(dataset) * train_ratio)
    train, test = chainer.datasets.split_dataset_random(dataset, train_size, seed=13)
I used the same seed (=13) to extract the train and test data used in the training phase.
Load trained model
    # Load trained model
    model = MyMLP(args.unit)  # type: MyMLP
    if args.gpu >= 0:
        chainer.cuda.get_device(args.gpu).use()  # Make a specified GPU current
        model.to_gpu()  # Copy the model to the GPU
    xp = np if args.gpu < 0 else cuda.cupy

    serializers.load_npz(args.modelpath, model)
The procedure to load the trained model is
- Instantiate the model (which is a subclass of
Chain:here, it isMyMLP) - Send the parameters to GPU if necessary.
- Load the trained parameters using
serializers.load_npzfunction.
Predict with minibatch
Prepare minibatch from dataset with concat_examples
We need to feed minibatch instead of dataset itself into the model. The minibatch was constructed by the Iterator in training phase. In predict phase, it might be too much to prepare Iterator, then how to construct minibatch?
There is a convenient function, concat_examples, to prepare minibatch from dataset. It works as written in this figure.
chainer.dataset.concat_examples(batch, device=None, padding=None)

Usually when we access dataset by slice indexing, for example dataset[i:j], it returns a list where data is sequential. concat_examples separates each element of data and concatenates it to generate minibatch.
You can use as follows,
from chainer.dataset import concat_examples

x, t = concat_examples(test[i:i + batchsize])
y = model.predict(x)
...
※ You can see more detail actual usage example code of concat_examples in dataset_introduction.ipynb, also refer official doc for more details.
Predict code configuration
Predict phase has some difference compared to training phase,
- Function behavior
– Expected behavior of some functions are different between training phase and validation/predict phase. For example,F.dropoutis expected to drop out some unit in the training phase while it is better to not to drop out in validation/predict phase.These kinds of function behavior is handled bychainer.config.trainconfiguration. - Back propagation is not necessary
When back propagation is enabled, the model need to construct computational graph which requires additional memory. However back propagation is not necessary in validation/predict phase and we can omit constructing computational graph to reduce memory usage.
This can be controlled bychainer.config.enable_backprop, andchainer.no_backprop_mode()function can be used for convenient method.
By considering above, we can write predict code in the MyMLP model as,
class MyMLP(chainer.Chain):

    ...

    def predict(self, *args):
        with chainer.using_config('train', False):
            with chainer.no_backprop_mode():
                return self.forward(*args)
Finally, predict code can be written as follows,
    # Predict
    x_list = []
    y_list = []
    t_list = []
    for i in range(0, len(test), batchsize):
        x, t = concat_examples(test[i:i + batchsize])
        y = model.predict(x)
        y_list.append(y.data)
        x_list.append(x)
        t_list.append(t)

    x_test = np.concatenate(x_list)[:, 0]
    y_test = np.concatenate(y_list)[:, 0]
    t_test = np.concatenate(t_list)[:, 0]
    print('x', x_test)
    print('y', y_test)
    print('t', t_test)
Plot the result
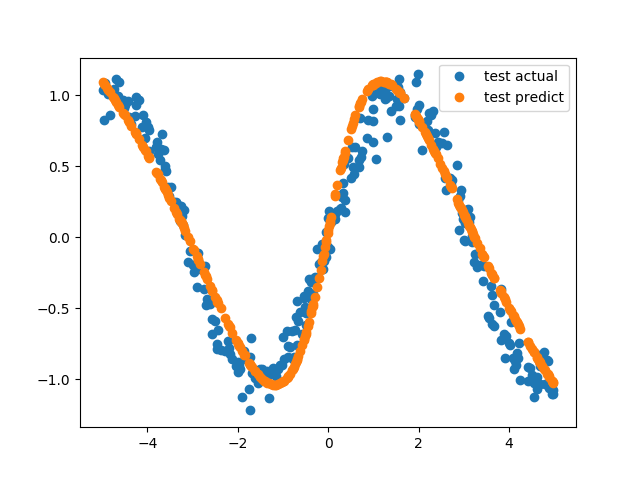
This is a regression task, so let’s see the difference between actual point and model’s predicted point.
    plt.figure()
    plt.plot(x_test, t_test, 'o', label='test actual')
    plt.plot(x_test, y_test, 'o', label='test predict')
    plt.legend()
    plt.savefig('predict.png')
which outputs this figure,
Appendix: Refactoring predict code
Move predict function into model class: if you want to simplify main predict code in predict_custom_dataset1.py, you may move predict for loop into model side.
In MyMLP class, define predict2 method as
    def predict2(self, *args, batchsize=32):
        data = args[0]
        x_list = []
        y_list = []
        t_list = []
        for i in range(0, len(data), batchsize):
            x, t = concat_examples(data[i:i + batchsize])
            y = self.predict(x)
            y_list.append(y.data)
            x_list.append(x)
            t_list.append(t)

        x_array = np.concatenate(x_list)[:, 0]
        y_array = np.concatenate(y_list)[:, 0]
        t_array = np.concatenate(t_list)[:, 0]
        return x_array, y_array, t_array
then, we can write main predict code very simply,
"""Inference/predict code for MNIST
model must be trained before inference, train_mnist_4_trainer.py must be executed beforehand.
"""
from __future__ import print_function
import argparse
import time

import numpy as np
import six
import matplotlib.pyplot as plt

import chainer
import chainer.functions as F
import chainer.links as L
from chainer import Chain, Variable, optimizers, serializers
from chainer import datasets, training, cuda, computational_graph
from chainer.dataset import concat_examples

from my_mlp import MyMLP
from my_dataset import MyDataset


def main():
    parser = argparse.ArgumentParser(description='Chainer example: MNIST')
    parser.add_argument('--modelpath', '-m', default='result/mymlp.model',
                        help='Model path to be loaded')
    parser.add_argument('--gpu', '-g', type=int, default=-1,
                        help='GPU ID (negative value indicates CPU)')
    parser.add_argument('--unit', '-u', type=int, default=50,
                        help='Number of units')
    parser.add_argument('--batchsize', '-b', type=int, default=10,
                        help='Number of images in each mini-batch')
    args = parser.parse_args()

    batchsize = args.batchsize
    # Load the custom dataset
    dataset = MyDataset('data/my_data.csv')
    train_ratio = 0.7
    train_size = int(len(dataset) * train_ratio)
    train, test = chainer.datasets.split_dataset_random(dataset, train_size, seed=13)

    # Load trained model
    model = MyMLP(args.unit)  # type: MyMLP
    if args.gpu >= 0:
        chainer.cuda.get_device(args.gpu).use()  # Make a specified GPU current
        model.to_gpu()  # Copy the model to the GPU
    xp = np if args.gpu < 0 else cuda.cupy

    serializers.load_npz(args.modelpath, model)

    # Predict
    x_test, y_test, t_test = model.predict2(test)
    print('x', x_test)
    print('y', y_test)
    print('t', t_test)

    plt.figure()
    plt.plot(x_test, t_test, 'o', label='test actual')
    plt.plot(x_test, y_test, 'o', label='test predict')
    plt.legend()
    plt.savefig('predict2.png')


if __name__ == '__main__':
    main()
model prediction is written in one line of code,
x_test, y_test, t_test = model.predict2(test)