I’m testing Google’s sample app https://github.com/googlesamples/androidtv-Leanback. After start playing video and go back to Leanback Launcher home display, it keeps playing in background with now playing card. I found pause key stops background video and changes back to normal background, and only after that MediaSession callback is working. After background changes to normal Leanback Launcher background paper, play/pause button changes the video status of now playing card, However background is not video but normal display… Is there a way to show video in background with this condition?
See below video for the behavior I’m writing about. When background video playback changes to normal background, I’m pressing pause button on Leanback Launcher display. After that, I’m pressing play button of remote controller to play/pause, which only working in now playing card, but background is not video.
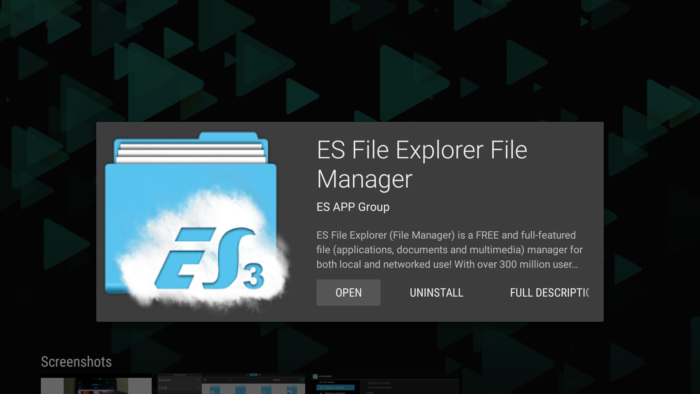
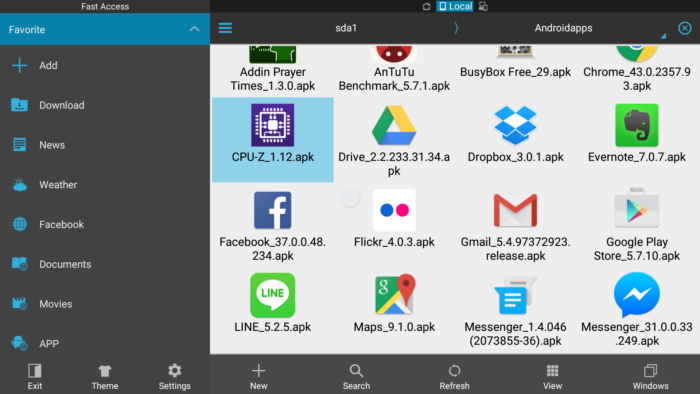
If you have Android phone, you can extract .apk file (Android application file) and try to move it to your Android TV. I recommend to use “ES file explorer” to extract & install apk file.
Get apps that you want to install in your Android phone from Google play.
plug-in USB drive to Android TV, install .apk file using ES file explorer app on Android TV side.
I will explain this part in detail.
4-1. Install ES File Explorer Manager app on Android TV.
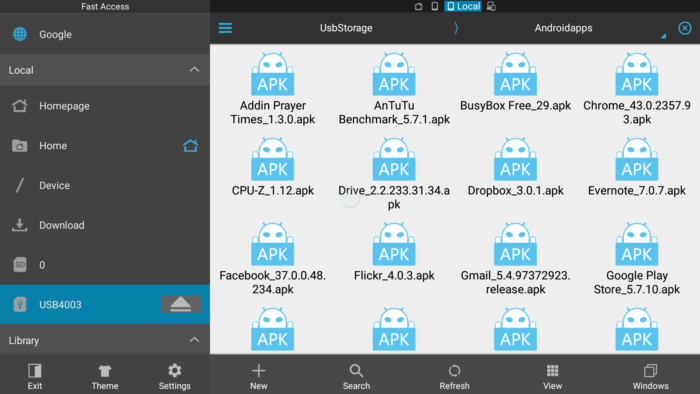
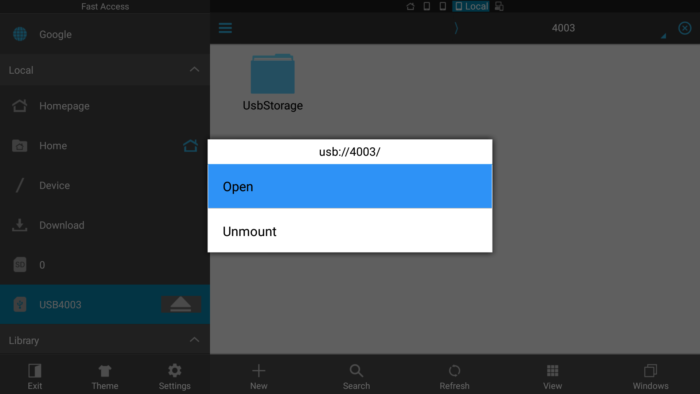
4-2. Open ES file explorer, with plugging in USB drive to Android TV. Go to left side bar and you can find USB in Local tab.
4-3. Open it.
4-4. You can find apk file inside USB drive now.
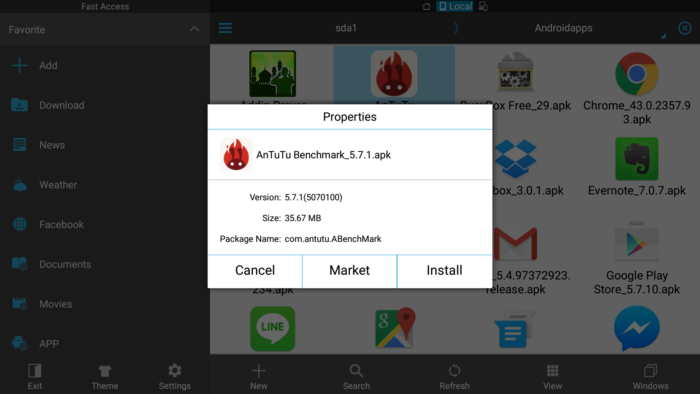
4-5. Just select apk file to install it!
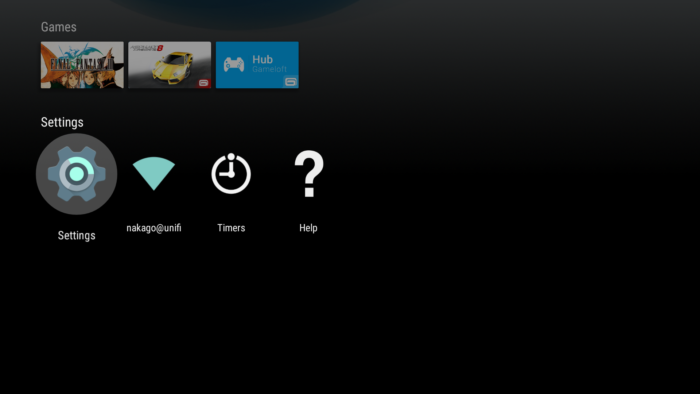
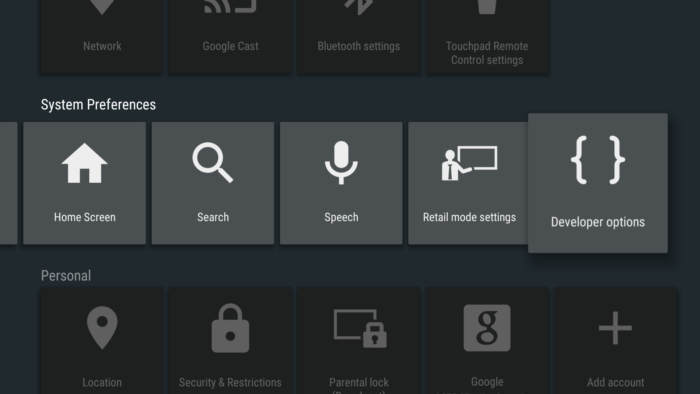
* Note that to install apk file, we need to set some security settings. Go to “Settings” → “Security & Restrictions” in Personal Row → “Unknown sources” → Change to “On” to allow install apk file externally.
4-6. Done! If Installled application is not appeared on LeanbackLauncher, try to find in Settings → Apps.
In Another way, if you are Android app developer, you may use adb command to install apk.
3′. Move extracted .apk file to your PC. 4′. install apk file using adb command from PC. $ adb install -r [your_extracted_apk_filename]
So basically, you can try most of the Android phone’s apps in your Android TV too!
* CAUTION: The tips written here is not officially supported. I don’t take any responsibility caused by this Technique. Try it with your own responsibility.
The sample implementation is done in Google’s latest sample Android TV application. AOSP sample application implementation does not have MediaSession implementation yet (in API 21, 22).
In previous chapter, I explained that following Video controls are needed to be impmented.
Action’s UI update part (done in previous chapter)
Video control part (done in previous chapter) MediaSession implementation, Video control via MediaController’s TransportControls (this chapter)
– MediaSession can handle the action when user presses TV remote controller’s video control button. – It allows other activity to inherite video control. Especially LeanbackLauncher, Home display, can play video in background.
set MediaMetadata to MediaSession (this chapter) – “Now playing card” will appear at the top of recommendation row.
In this chapter, we proceed to implement Video controls using MediaSession. We can pass VideoView control to LeanbackLauncher by using MediaSession, which results to achieve playing video background in LeanbackLauncher.
For 3, we create MediaSession in PlaybackOverlayActivity, and control it from MediaController in PlaybackOverlayFragment.
For 4, MediaSession’s Metadata is updated using MediaMetadata & PlaybackState class to update “Now playing card”.
This chapter’s implementation is almost independent with previous chapter’s implementation. Before implementing MediaSession, I will implement requestVisibleBehind method, so that we can play video in background of LeanbackLauncher app.
Implement requestVisibleBehind
This method is added in API 21 (Lolipop), AOSP explanation explains that
If this call is successful then the activity will remain visible after onPause() is called, and is allowed to continue playing media in the background.
Sample implementation is as follows.
    @Override
    public void onPause() {
        super.onPause();
        if (!requestVisibleBehind(true)) {
            // Try to play behind launcher, but if it fails, stop playback.
            mPlaybackController.playPause(false);
        }
    }
After this implementation, when you play video contents in your application and press “Home” key to go back LeanbackLauncher, the video is remain playing in background. .
Class structure of this chapter
We handle 3 classes in this chapter.
PlaybackOverlayActivity – manage lifecycle, pass intent information to PlaybackController – MediaSession’s life time is linked with activity
PlaybackOverlayFragment – handle UI of PlaybackControlsRow – MediaController Callback function is used to update UI according to the current playback state
PlaybackController – manage video playback – video control functions – MediaSessionCallback for receiving Video control key from TV remote controller
Create & release MediaSession
So far, we cannot control this video by using video control key in remote controller. Let’s implement MediaSession to define the action for each video control key in remote controller. At first, we create MediaSession in Constructor of PlaybackController, which is invoked by PlaybackOverlayActivity.
We can set callback, MediaSessionCallback, to MediaSession. It defines the precise behavior of each video control button which will be explained later.
setFlags method with the argument FLAG_HANDLES_MEDIA_BUTTONS & FLAG_HANDLES_TRANSPORT_CONTROLS are necessary to enable remote controller key to control video.
After create, we must release MediaSession when it finishes.
Video control functions are implemented in MediaSessionCallback class. As name suggests, each video control action is implemented in corresponding callback function. This callback is called from 2 ways, which is “remote controller media key” or “UI video control button in PlaybackControlsRow”.
    public void playPause(boolean doPlay) {

        if (mCurrentPlaybackState == PlaybackState.STATE_NONE) {
            /* Callbacks for mVideoView */
            setupCallbacks();
        }

        //if (doPlay && mCurrentPlaybackState != PlaybackState.STATE_PLAYING) {
        if (doPlay) { // Play
            Log.d(TAG, "playPause: play");
            if(mCurrentPlaybackState == PlaybackState.STATE_PLAYING) {
                /* if current state is already playing, do nothing */
                return;
            } else {
                mCurrentPlaybackState = PlaybackState.STATE_PLAYING;
                mVideoView.start();
                mStartTimeMillis = System.currentTimeMillis();
            }
        } else { // Pause
            Log.d(TAG, "playPause: pause");
            if(mCurrentPlaybackState == PlaybackState.STATE_PAUSED) {
                /* if current state is already paused, do nothing */
                return;
            } else {
                mCurrentPlaybackState = PlaybackState.STATE_PAUSED;
            }
            setPosition(mVideoView.getCurrentPosition());
            mVideoView.pause();

        }

        updatePlaybackState();
    }

    public void fastForward() {
        if (mDuration != -1) {
            // Fast forward 10 seconds.
            setPosition(getCurrentPosition() + (10 * 1000));
            mVideoView.seekTo(mPosition);
        }

    }

    public void rewind() {
        // rewind 10 seconds
        setPosition(getCurrentPosition() - (10 * 1000));
        mVideoView.seekTo(mPosition);
    }


    private class MediaSessionCallback extends MediaSession.Callback {
        @Override
        public void onPlay() {
            playPause(true);
        }

        @Override
        public void onPause() {
            playPause(false);
        }

        @Override
        public void onSkipToNext() {
            if (++mCurrentItem >= mItems.size()) { // Current Item is set to next here
                mCurrentItem = 0;
            }

            Movie movie = mItems.get(mCurrentItem);
            //Movie movie = VideoProvider.getMovieById(mediaId);
            if (movie != null) {
                setVideoPath(movie.getVideoUrl());
                //mCurrentPlaybackState = PlaybackState.STATE_PAUSED;
                //updateMetadata(movie);
                updateMetadata();
                playPause(mCurrentPlaybackState == PlaybackState.STATE_PLAYING);
            } else {
                Log.e(TAG, "onSkipToNext movie is null!");
            }

        }


        @Override
        public void onSkipToPrevious() {
            if (--mCurrentItem < 0) { // Current Item is set to previous here
                mCurrentItem = mItems.size()-1;
            }

            Movie movie = mItems.get(mCurrentItem);
            //Movie movie = VideoProvider.getMovieById(mediaId);
            if (movie != null) {
                setVideoPath(movie.getVideoUrl());
                //mCurrentPlaybackState = PlaybackState.STATE_PAUSED;
                updateMetadata();
                playPause(mCurrentPlaybackState == PlaybackState.STATE_PLAYING);
            } else {
                Log.e(TAG, "onSkipToPrevious movie is null!");
            }
        }

        @Override
        public void onPlayFromMediaId(String mediaId, Bundle extras) {
            mCurrentItem = Integer.parseInt(mediaId);
            Movie movie = mItems.get(mCurrentItem);
            //Movie movie = VideoProvider.getMovieById(mediaId);
            if (movie != null) {
                setVideoPath(movie.getVideoUrl());
                // mCurrentPlaybackState = PlaybackState.STATE_PAUSED;
                // updateMetadata(movie);
                updateMetadata();
                playPause(mCurrentPlaybackState == PlaybackState.STATE_PLAYING);
            }
        }

        @Override
        public void onSeekTo(long pos) {
            setPosition((int) pos);
            mVideoView.seekTo(mPosition);
            updatePlaybackState();
        }

        @Override
        public void onFastForward() {
            fastForward();
        }

        @Override
        public void onRewind() {
            rewind();
        }
    }
Video control by remote controller key
To enable video control from remote controller, we need to explicitly set available actions to MediaSession. Available actions are defined in PlaybackState class, sample implementation is below.
    private void updatePlaybackState() {
        PlaybackState.Builder stateBuilder = new PlaybackState.Builder()
                .setActions(getAvailableActions());
        int state = PlaybackState.STATE_PLAYING;
        if (mCurrentPlaybackState == PlaybackState.STATE_PAUSED || mCurrentPlaybackState == PlaybackState.STATE_NONE) {
            state = PlaybackState.STATE_PAUSED;
        }
        stateBuilder.setState(state, getCurrentPosition(), 1.0f);
        mSession.setPlaybackState(stateBuilder.build());
    }

    private long getAvailableActions() {
        long actions = PlaybackState.ACTION_PLAY |
                PlaybackState.ACTION_PAUSE |
                PlaybackState.ACTION_PLAY_PAUSE |
                PlaybackState.ACTION_REWIND |
                PlaybackState.ACTION_FAST_FORWARD |
                PlaybackState.ACTION_SKIP_TO_PREVIOUS |
                PlaybackState.ACTION_SKIP_TO_NEXT |
                PlaybackState.ACTION_PLAY_FROM_MEDIA_ID |
                PlaybackState.ACTION_PLAY_FROM_SEARCH;
        return actions;
    }
In this example, available actions are decided in getAvailableActionsmethod, by adding actions using logical disjunction.
Video control from UI – MediaController.getTransportControls
To control MediaSession from PlaybackControlsRow in VideoDetailsFragment, we use MediaController. The MediaController is created in the constructor of PlaybackController and it owns token of MediaSession.
When user clicks video control button, it will invoke MediaSessionCallback method using MediaController.getTransportControls() method.
Video control part is done. However, we need to update UI of PlayControlsRow depending according to the video control.
Updating UI of VideoDetailsFragment
We need to change the UI when video control action has executed, and video playback status has changed. We can get this event by using MediaController’s callback function. 2 callback methods are introduced in the following.
onPlaybackStateChanged
onMetadataChanged
To use these callback methods, you can make subclass which extends MediaController.Callback class, and override these methods. To use this class, we can call MediaController’s registerCallback/unregisterCallback method to get event of MediaController.
    @Override
    public void onAttach(Activity activity) {
        super.onAttach(activity);
        mMediaController = getActivity().getMediaController();
        Log.d(TAG, "register callback of mediaController");
        if(mMediaController == null){
            Log.e(TAG, "mMediaController is null");
        }
        mMediaController.registerCallback(mMediaControllerCallback);

    }

    @Override
    public void onDetach() {
        if (mMediaController != null) {
            Log.d(TAG, "unregister callback of mediaController");
            mMediaController.unregisterCallback(mMediaControllerCallback);
        }
        super.onDetach();
    }

    private class MediaControllerCallback extends MediaController.Callback {
        @Override
        public void onPlaybackStateChanged(final PlaybackState state) {
            Log.d(TAG, "playback state changed: " + state.toString());
        }

        @Override
        public void onMetadataChanged(final MediaMetadata metadata) {
            Log.d(TAG, "received update of media metadata");
        }
    }
Updating video control icons in onPlaybackStateChanged
Update PlaybackState
PlaybackState is updated in PlaybackController.
    private void updatePlaybackState() {
        PlaybackState.Builder stateBuilder = new PlaybackState.Builder()
                .setActions(getAvailableActions());
        int state = PlaybackState.STATE_PLAYING;
        if (mCurrentPlaybackState == PlaybackState.STATE_PAUSED || mCurrentPlaybackState == PlaybackState.STATE_NONE) {
            state = PlaybackState.STATE_PAUSED;
        }
        // stateBuilder.setState(state, mPosition, 1.0f);
        stateBuilder.setState(state, getCurrentPosition(), 1.0f);
        mSession.setPlaybackState(stateBuilder.build());
    }
For example, it will be called in playPause method. When user start play video state will change from STATE_PLAYING to STATE_PAUSED, or vice versa. PlaybackState update is set (notified) to MediaSession.
Callback
When PlaybackState has changed by setPlaybackState above, this event can be received with onPlaybackStateChanged callback. We can update play/pause icon in PlaybackControlsRow.
    private class MediaControllerCallback extends MediaController.Callback {
        @Override
        public void onPlaybackStateChanged(final PlaybackState state) {
            Log.d(TAG, "playback state changed: " + state.toString());
            mHandler.post(new Runnable() {
                @Override
                public void run() {
                    if (state.getState() == PlaybackState.STATE_PLAYING) {
                        mPlaybackController.setCurrentPlaybackState(PlaybackState.STATE_PLAYING);
                        startProgressAutomation();
                        // setFadingEnabled(false);
                        mPlayPauseAction.setIndex(PlaybackControlsRow.PlayPauseAction.PAUSE);
                        mPlayPauseAction.setIcon(mPlayPauseAction.getDrawable(PlaybackControlsRow.PlayPauseAction.PAUSE));
                        notifyChanged(mPlayPauseAction);
                    } else if (state.getState() == PlaybackState.STATE_PAUSED) {
                        mPlaybackController.setCurrentPlaybackState(PlaybackState.STATE_PAUSED);
                        // setFadingEnabled(false);
                        mPlayPauseAction.setIndex(PlaybackControlsRow.PlayPauseAction.PLAY);
                        mPlayPauseAction.setIcon(mPlayPauseAction.getDrawable(PlaybackControlsRow.PlayPauseAction.PLAY));
                        notifyChanged(mPlayPauseAction);
                    }

                    int currentTime = (int) state.getPosition();
                    mPlaybackControlsRow.setCurrentTime(currentTime);
                    // mPlaybackControlsRow.setBufferedProgress(currentTime + SIMULATED_BUFFERED_TIME);
                    mPlaybackControlsRow.setBufferedProgress(mPlaybackController.calcBufferedTime(currentTime));

                }
            });
        }

        ...
    }
update Media information in onMetadataChanged
Update MediaMetadata
MediaMetadata class is used to set metadata information of the video. We can set each attribute of metadata by using put method in MediaMetadata.Builder. Again, MediaMetadata update is set (notified) to MediaSession.
    public void updateMetadata(Movie movie) {
        final MediaMetadata.Builder metadataBuilder = new MediaMetadata.Builder();

        String title = movie.getTitle().replace("_", " -");

        metadataBuilder.putString(MediaMetadata.METADATA_KEY_MEDIA_ID, Long.toString(movie.getId()));
        metadataBuilder.putString(MediaMetadata.METADATA_KEY_DISPLAY_TITLE, title);
        metadataBuilder.putString(MediaMetadata.METADATA_KEY_DISPLAY_SUBTITLE, movie.getStudio());
        metadataBuilder.putString(MediaMetadata.METADATA_KEY_DISPLAY_DESCRIPTION, movie.getDescription());
        metadataBuilder.putString(MediaMetadata.METADATA_KEY_DISPLAY_ICON_URI, movie.getCardImageUrl());
        metadataBuilder.putLong(MediaMetadata.METADATA_KEY_DURATION, mDuration);

        // And at minimum the title and artist for legacy support
        metadataBuilder.putString(MediaMetadata.METADATA_KEY_TITLE, title);
        metadataBuilder.putString(MediaMetadata.METADATA_KEY_ARTIST, movie.getStudio());

        Glide.with(mActivity)
                .load(Uri.parse(movie.getCardImageUrl()))
                .asBitmap()
                .into(new SimpleTarget<Bitmap>(500, 500) {
                    @Override
                    public void onResourceReady(Bitmap bitmap, GlideAnimation anim) {

                        metadataBuilder.putBitmap(MediaMetadata.METADATA_KEY_ART, bitmap);
                        mSession.setMetadata(metadataBuilder.build());
                    }
                });
    }
By setting correct MediaMetadata to MediaSession, Android TV will show Now Playing Card on LeanbackLauncher, which will be explained again later.
Callback
When MediaMetadata has changed by setMetadata above, this event can be received with onMetadataChanged callback. We can update item value of PlaybackControlsRow.
    private class MediaControllerCallback extends MediaController.Callback {

        ...

        @Override
        public void onMetadataChanged(final MediaMetadata metadata) {
            Log.d(TAG, "received update of media metadata");
                    updateMovieView(
                            metadata.getString(MediaMetadata.METADATA_KEY_DISPLAY_TITLE),
                            metadata.getString(MediaMetadata.METADATA_KEY_DISPLAY_SUBTITLE),
                            metadata.getString(MediaMetadata.METADATA_KEY_DISPLAY_ICON_URI),
                            metadata.getLong(MediaMetadata.METADATA_KEY_DURATION)
                    );
        }
    }

    private void updateMovieView(String title, String studio, String cardImageUrl, long duration) {
        Log.d(TAG, "updateMovieView");

        if (mPlaybackControlsRow.getItem() != null) {
            Movie item = (Movie) mPlaybackControlsRow.getItem();
            item.setTitle(title);
            item.setStudio(studio);
        } else {
            Log.e(TAG, "mPlaybackControlsRow.getItem is null!");
        }
        mPlaybackControlsRow.setTotalTime((int) duration);
        mPlaybackControlsRow.setCurrentTime(0);
        mPlaybackControlsRow.setBufferedProgress(0);
        mRowsAdapter.notifyArrayItemRangeChanged(0, mRowsAdapter.size());

        // Show the video card image if there is enough room in the UI for it.
        // If you have many primary actions, you may not have enough room.
        if (SHOW_IMAGE) {
            mPlaybackControlsRowTarget = new PicassoPlaybackControlsRowTarget(mPlaybackControlsRow);
            updateVideoImage(cardImageUrl);
        }
    }
Build and run
Now video playcontrol is possible from both clicking button on PlayControlsRow and pushing media key in remote controller. In the above video, I’m controlling video contents via remote controller and not using UI on the screen 🙂
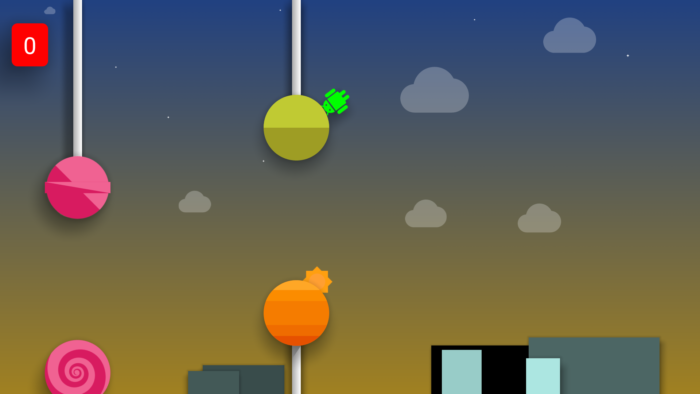
Now Playing Card
Now Playing Card on Leanback Launcher screen.
If the MediaMetadata is correctly set to MediaSession, Now Playing Card will appear to the LeanbackLauncher (Home display). It notifies information of current playing media to user. Also, Now Playing Card enables user to go back to your app to control video (pause/go to next video etc).
For Video controls, we have several stuff to explain.
Action’s UI update part (this chapter)
Video control part (this chapter)
MediaSession implementation, Video control via MediaController’s TransportControls (next chapter) – MediaSession can handle the action when user presses TV remote controller’s video control button. – It allows other activity to inherite video control. Especially LeanbackLauncher, Home display, can play video in background.
set MediaMetadata to MediaSession (next chapter) – “Now playing card” will appear at the top of recommendation row.
In this chapter, Video controls implementation is explained. Since Google’s sample application implements all 1~4, source code is bit long and difficult to understand for beginners. I did a minimum implementation for only 1~2. I will just explain these implementation for each part in this chapter, so please download & refer source code on github at first (I did a refactoring for using MovieProvider class to prepare movie contents). The Technic in this chapter is general in Android.
Next chapter I will explain about MediaSession implementation. We can pass VideoView control to LeanbackLauncher by using MediaSession, which results to achieve playing video background in LeanbackLauncher.
VideoView handling
PlaybackOverlayActivity need to have VideoView field variable “mVideoView” to control video.
public class PlaybackOverlayActivity extends Activity {

    private static final String TAG = PlaybackOverlayActivity.class.getSimpleName();

    private VideoView mVideoView;

    private LeanbackPlaybackState mPlaybackState = LeanbackPlaybackState.IDLE;

    private int mPosition = 0;
    private long mStartTimeMillis;
    private long mDuration = -1;

    /*
     * List of various states that we can be in
     */
    public enum LeanbackPlaybackState {
        PLAYING, PAUSED, IDLE
    }

    @Override
    protected void onCreate(Bundle savedInstanceState) {
        super.onCreate(savedInstanceState);
        setContentView(R.layout.activity_playback_overlay);

        loadViews();
    }

    @Override
    public void onDestroy() {
        super.onDestroy();
        stopPlayback();
        mVideoView.suspend();
        mVideoView.setVideoURI(null);
    }

    private void loadViews() {
        mVideoView = (VideoView) findViewById(R.id.videoView);
        mVideoView.setFocusable(false);
        mVideoView.setFocusableInTouchMode(false);

        Movie movie = (Movie) getIntent().getSerializableExtra(DetailsActivity.MOVIE);
        setVideoPath(movie.getVideoUrl());

    }

    public void setVideoPath(String videoUrl) {
        setPosition(0);
        mVideoView.setVideoPath(videoUrl);
        mStartTimeMillis = 0;
        mDuration = Utils.getDuration(videoUrl);
    }

    private void stopPlayback() {
        if (mVideoView != null) {
            mVideoView.stopPlayback();
        }
    }
From here, Each action’s implementation is explained. Note that it is important to differentiate “UI update part” and “Video control part”, because Video control part will move to MediaSession in next chapter.
In the source code, I implemented “UI update part” in PlaybackOverlayFragment.java, while “Video control part” is implemented in PlaybackOverlayActivity.java.
PlayPauseAction
    private void togglePlayback(boolean playPause) {
        /* Video control part */
        ((PlaybackOverlayActivity) getActivity()).playPause(playPause);

        /* UI control part */
        playbackStateChanged();
    }
Video control part will handle play/pause video in VideoView.
public void playPause(boolean doPlay) {
    if (mPlaybackState == LeanbackPlaybackState.IDLE) {
        /* Callbacks for mVideoView */
        setupCallbacks();
    }

    if (doPlay && mPlaybackState != LeanbackPlaybackState.PLAYING) {
        mPlaybackState = LeanbackPlaybackState.PLAYING;
        if (mPosition > 0) {
            mVideoView.seekTo(mPosition);
        }
        mVideoView.start();
        mStartTimeMillis = System.currentTimeMillis();
    } else {
        mPlaybackState = LeanbackPlaybackState.PAUSED;
        int timeElapsedSinceStart = (int) (System.currentTimeMillis() - mStartTimeMillis);
        setPosition(mPosition + timeElapsedSinceStart);
        mVideoView.pause();
    }
}

private void setupCallbacks() {

    mVideoView.setOnErrorListener(new MediaPlayer.OnErrorListener() {

        @Override
        public boolean onError(MediaPlayer mp, int what, int extra) {
            mVideoView.stopPlayback();
            mPlaybackState = LeanbackPlaybackState.IDLE;
            return false;
        }
    });

    mVideoView.setOnPreparedListener(new MediaPlayer.OnPreparedListener() {
        @Override
        public void onPrepared(MediaPlayer mp) {
            if (mPlaybackState == LeanbackPlaybackState.PLAYING) {
                mVideoView.start();
            }
        }
    });

    mVideoView.setOnCompletionListener(new MediaPlayer.OnCompletionListener() {
        @Override
        public void onCompletion(MediaPlayer mp) {
            mPlaybackState = LeanbackPlaybackState.IDLE;
        }
    });
}
UI control part will handle
Toggling icon of Play/Pause
Update current time of video
    public void playbackStateChanged() {

        if (mCurrentPlaybackState != PlaybackState.STATE_PLAYING) {
            mCurrentPlaybackState = PlaybackState.STATE_PLAYING;
            startProgressAutomation();
            setFadingEnabled(true);
            mPlayPauseAction.setIndex(PlaybackControlsRow.PlayPauseAction.PAUSE);
            mPlayPauseAction.setIcon(mPlayPauseAction.getDrawable(PlaybackControlsRow.PlayPauseAction.PAUSE));
            notifyChanged(mPlayPauseAction);
        } else if (mCurrentPlaybackState != PlaybackState.STATE_PAUSED) {
            mCurrentPlaybackState = PlaybackState.STATE_PAUSED;
            stopProgressAutomation();
            //setFadingEnabled(false); // if set to false, PlaybackcontrolsRow will always be on the screen
            mPlayPauseAction.setIndex(PlaybackControlsRow.PlayPauseAction.PLAY);
            mPlayPauseAction.setIcon(mPlayPauseAction.getDrawable(PlaybackControlsRow.PlayPauseAction.PLAY));
            notifyChanged(mPlayPauseAction);
        }

        int currentTime = ((PlaybackOverlayActivity) getActivity()).getPosition();
        mPlaybackControlsRow.setCurrentTime(currentTime);
        mPlaybackControlsRow.setBufferedProgress(currentTime + SIMULATED_BUFFERED_TIME);

    }

    private void startProgressAutomation() {
        if (mRunnable == null) {
            mRunnable = new Runnable() {
                @Override
                public void run() {
                    int updatePeriod = getUpdatePeriod();
                    int currentTime = mPlaybackControlsRow.getCurrentTime() + updatePeriod;
                    int totalTime = mPlaybackControlsRow.getTotalTime();
                    mPlaybackControlsRow.setCurrentTime(currentTime);
                    mPlaybackControlsRow.setBufferedProgress(currentTime + SIMULATED_BUFFERED_TIME);

                    if (totalTime > 0 && totalTime <= currentTime) {
                        stopProgressAutomation();
                        //next(true);
                    } else {
                        mHandler.postDelayed(this, updatePeriod);
                    }
                }
            };
            mHandler.postDelayed(mRunnable, getUpdatePeriod());
        }
    }

    private void stopProgressAutomation() {
        if (mHandler != null && mRunnable != null) {
            mHandler.removeCallbacks(mRunnable);
            mRunnable = null;
        }
    }
Rewind & FastForward
    private void fastForward() {
        /* Video control part */
        ((PlaybackOverlayActivity) getActivity()).fastForward();

        /* UI part */
        int currentTime = ((PlaybackOverlayActivity) getActivity()).getPosition();
        mPlaybackControlsRow.setCurrentTime(currentTime);
        mPlaybackControlsRow.setBufferedProgress(currentTime + SIMULATED_BUFFERED_TIME);
    }

    private void rewind() {
        /* Video control part */
        ((PlaybackOverlayActivity) getActivity()).rewind();

        /* UI part */
        int currentTime = ((PlaybackOverlayActivity) getActivity()).getPosition();
        mPlaybackControlsRow.setCurrentTime(currentTime);
        mPlaybackControlsRow.setBufferedProgress(currentTime + SIMULATED_BUFFERED_TIME);
    }
Here, rewind & fast forward Video control implementations are done in easy way, just rewind/fast forward 10 seconds from current position.
    public void fastForward() {
        if (mDuration != -1) {
            // Fast forward 10 seconds.
            setPosition(mVideoView.getCurrentPosition() + (10 * 1000));
            mVideoView.seekTo(mPosition);
        }
    }

    public void rewind() {
        // rewind 10 seconds
        setPosition(mVideoView.getCurrentPosition() - (10 * 1000));
        mVideoView.seekTo(mPosition);
    }
UI control part is updating current time of video.
SkipPrevious & SkipNext
    private void next(boolean autoPlay) {
        /* Video control part */
        if (++mCurrentItem >= mItems.size()) { // Current Item is set to next here
            mCurrentItem = 0;
        }

        if (autoPlay) {
            mCurrentPlaybackState = PlaybackState.STATE_PAUSED;
        }

        Movie movie = mItems.get(mCurrentItem);
        if (movie != null) {
            ((PlaybackOverlayActivity) getActivity()).setVideoPath(movie.getVideoUrl());
            ((PlaybackOverlayActivity) getActivity()).setPlaybackState(PlaybackOverlayActivity.LeanbackPlaybackState.PAUSED);
            ((PlaybackOverlayActivity) getActivity()).playPause(autoPlay);
        }

        /* UI part */
        playbackStateChanged();
        updatePlaybackRow(mCurrentItem);
    }

    private void prev(boolean autoPlay) {
        /* Video control part */
        if (--mCurrentItem < 0) { // Current Item is set to previous here
            mCurrentItem = mItems.size() - 1;
        }
        if (autoPlay) {
            mCurrentPlaybackState = PlaybackState.STATE_PAUSED;
        }

        Movie movie = mItems.get(mCurrentItem);
        if (movie != null) {
            ((PlaybackOverlayActivity) getActivity()).setVideoPath(movie.getVideoUrl());
            ((PlaybackOverlayActivity) getActivity()).setPlaybackState(PlaybackOverlayActivity.LeanbackPlaybackState.PAUSED);
            ((PlaybackOverlayActivity) getActivity()).playPause(autoPlay);
        }

        /* UI part */
        playbackStateChanged();
        updatePlaybackRow(mCurrentItem);
    }
For Video control part, 2 functions are doing same thing except for first line. mCurrentItem is set to previous/next followed by setting proper video path by using setVideoPath method & play/pause depending on current play/pause status by using playPause method.
UI control part, first line calls playbackStateChanged() method, but it is only necessary to control startProgressAutomation/stopProgressAutomation to update current time status of video. updateplaybackRow method is to update DetailsDescription information of video content.
    private void updatePlaybackRow(int index) {
        Log.d(TAG, "updatePlaybackRow");
        if (mPlaybackControlsRow.getItem() != null) {
            Movie item = (Movie) mPlaybackControlsRow.getItem();
            item.setTitle(mItems.get(mCurrentItem).getTitle());
            item.setStudio(mItems.get(mCurrentItem).getStudio());

            mRowsAdapter.notifyArrayItemRangeChanged(0, 1);
            /* total time is necessary to show video playing time progress bar */
            int duration = (int) Utils.getDuration(mItems.get(mCurrentItem).getVideoUrl());
            Log.i(TAG, "videoUrl: " + mItems.get(mCurrentItem).getVideoUrl());
            Log.i(TAG, "duration = " + duration);
            mPlaybackControlsRow.setTotalTime(duration);
            mPlaybackControlsRow.setCurrentTime(0);
            mPlaybackControlsRow.setBufferedProgress(0);
        }
        if (SHOW_IMAGE) {
            mPlaybackControlsRowTarget = new PicassoPlaybackControlsRowTarget(mPlaybackControlsRow);
            updateVideoImage(mItems.get(mCurrentItem).getCardImageURI());
        }
    }
How to toggle icon’s color? You can change by setting index of the action. Implement below in onActionClicked method to check how each index setting will behave.
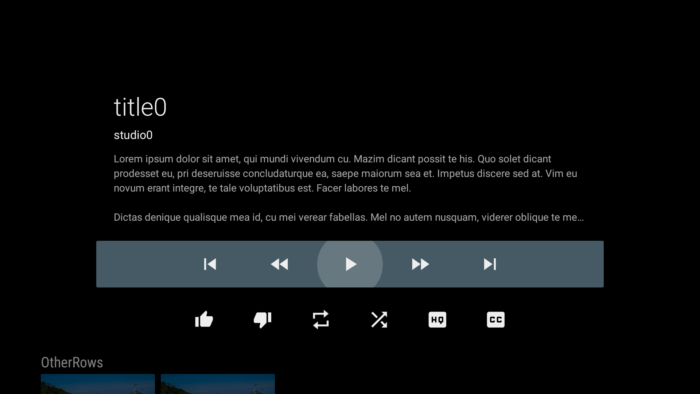
Now you can check that Video control is working correctly for PrimaryRow. *SecondaryRow’s action implementation may differ depending on your desire and I will skip here.
* Note. I could take VideoView’s image by screen recording, but I couldn’t take VideoView’s screen capture via Android studio’s debugging tool… (I’m using Sony Android TV for development of Android TV now.)
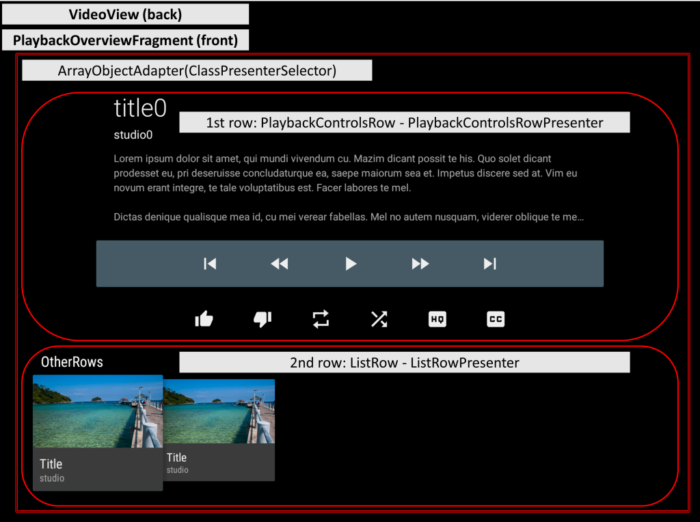
This PlaybackOverlayActivity will refer activity_playback_overlay.xml file in res/layout folder. It is constructed in 2 layer – VideoView in the back and PlaybackOverlayFragment in the front. VideoView is the view which we will play video contents, and PlaybackOverlayFragment will show the UI for controlling video, which we will focus on in this chapter. Implementat activity_playback_overlay.xml as follows.
We don’t need any modification for PlaybackOverlayActivity for now.
PlaybackOverlayFragment
New -> Java Class -> Name: PlaybackOverlayFragment
This PlaybackOverlayFragment is subclass of android.support.v17.leanback.app.PlaybackOverlayFragment which provides us component to make video control UI.
It works very similar to VideoDetailsFragment, so you just need to call setAdapter(adapter), after setting rows in adapter. For PlaybackOverlayFragment, we need to set instance of “PlaybackControlsRow”, which shows the video control UI, to first row element of adapter.
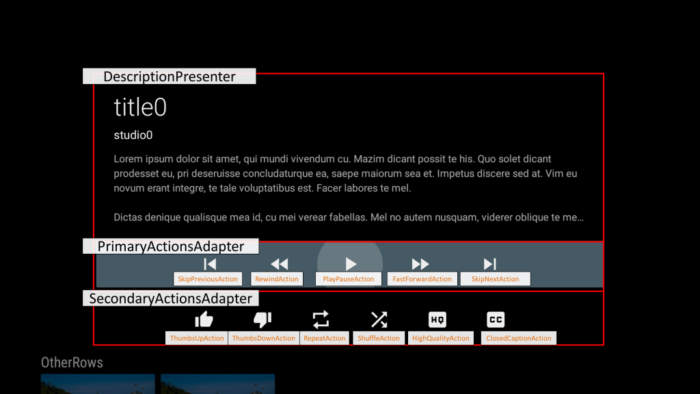
So let’s study “PlaybackControlsRow” and its Presenter, “PlaybackControlsRowPresenter”. We need to specify following in each instance.
PlaybackControlsRow
PrimaryActionsAdapter – It owns icons for main row
SecondaryActionsAdapter – It owns icons for sub rowNote that PlaybackControlsRow class provides us many useful default icons for video control. We only need to instantiate its inner class.
PlaybackControlsRowPresenter
DescriptionPresenter – It is Presenter for displaying item details on the top of PrimaryActions bar.
Above photo explains internal construction of PlaybackControlsRow – PlaybackControlsRowpresenter. Constructor of PlaybackControlsRowPresenter takes argument of DescriptionPresenter object, which determines how to show video details. This time, we will reuse DetailsDescriptionPresenter, which we made in previous chapter to show item details in DetailsFragment. PlaybackControlsRow have 2 rows inside to set the actions, PrimaryActionsAdapter and SecondaryActionsAdapter. We can set “actions” icon in these actionsadapters. See above photos for the available actions and these icons.
Sample implementation of PlaybackOverlayFragment is following.
package com.corochann.androidtvapptutorial;
import android.content.Context;
import android.os.Bundle;
import android.support.v17.leanback.widget.ArrayObjectAdapter;
import android.support.v17.leanback.widget.ClassPresenterSelector;
import android.support.v17.leanback.widget.ControlButtonPresenterSelector;
import android.support.v17.leanback.widget.HeaderItem;
import android.support.v17.leanback.widget.ListRow;
import android.support.v17.leanback.widget.ListRowPresenter;
import android.support.v17.leanback.widget.PlaybackControlsRow;
import android.support.v17.leanback.widget.PlaybackControlsRowPresenter;
import android.util.Log;
/**
* Created by corochann on 7/7/2015.
*/
public class PlaybackOverlayFragment extends android.support.v17.leanback.app.PlaybackOverlayFragment {
private static final String TAG = PlaybackOverlayFragment.class.getSimpleName();
private Movie mSelectedMovie;
private PlaybackControlsRow mPlaybackControlsRow;
private ArrayObjectAdapter mPrimaryActionAdapter;
private ArrayObjectAdapter mSecondaryActionAdapter;
private PlaybackControlsRow.PlayPauseAction mPlayPauseAction;
private PlaybackControlsRow.RepeatAction mRepeatAction;
private PlaybackControlsRow.ThumbsUpAction mThumbsUpAction;
private PlaybackControlsRow.ThumbsDownAction mThumbsDownAction;
private PlaybackControlsRow.ShuffleAction mShuffleAction;
private PlaybackControlsRow.SkipNextAction mSkipNextAction;
private PlaybackControlsRow.SkipPreviousAction mSkipPreviousAction;
private PlaybackControlsRow.FastForwardAction mFastForwardAction;
private PlaybackControlsRow.RewindAction mRewindAction;
private PlaybackControlsRow.HighQualityAction mHighQualityAction;
private PlaybackControlsRow.ClosedCaptioningAction mClosedCaptioningAction;
private PlaybackControlsRow.MoreActions mMoreActions;
@Override
public void onCreate(Bundle savedInstanceState) {
Log.i(TAG, "onCreate");
super.onCreate(savedInstanceState);
mSelectedMovie = (Movie) getActivity().getIntent().getSerializableExtra(DetailsActivity.MOVIE);
setBackgroundType(PlaybackOverlayFragment.BG_LIGHT);
setFadingEnabled(true);
setUpRows();
}
private ArrayObjectAdapter mRowsAdapter;
private void setUpRows() {
ClassPresenterSelector ps = new ClassPresenterSelector();
PlaybackControlsRowPresenter playbackControlsRowPresenter;
playbackControlsRowPresenter = new PlaybackControlsRowPresenter(new DetailsDescriptionPresenter());
ps.addClassPresenter(PlaybackControlsRow.class, playbackControlsRowPresenter);
ps.addClassPresenter(ListRow.class, new ListRowPresenter());
mRowsAdapter = new ArrayObjectAdapter(ps);
/*
* Add PlaybackControlsRow to mRowsAdapter, which makes video control UI.
* PlaybackControlsRow is supposed to be first Row of mRowsAdapter.
*/
addPlaybackControlsRow();
/* add ListRow to second row of mRowsAdapter */
addOtherRows();
setAdapter(mRowsAdapter);
}
private void addPlaybackControlsRow() {
mPlaybackControlsRow = new PlaybackControlsRow(mSelectedMovie);
mRowsAdapter.add(mPlaybackControlsRow);
ControlButtonPresenterSelector presenterSelector = new ControlButtonPresenterSelector();
mPrimaryActionsAdapter = new ArrayObjectAdapter(presenterSelector);
mSecondaryActionsAdapter = new ArrayObjectAdapter(presenterSelector);
mPlaybackControlsRow.setPrimaryActionsAdapter(mPrimaryActionsAdapter);
mPlaybackControlsRow.setSecondaryActionsAdapter(mSecondaryActionsAdapter);
Activity activity = getActivity();
mPlayPauseAction = new PlaybackControlsRow.PlayPauseAction(activity);
mRepeatAction = new PlaybackControlsRow.RepeatAction(activity);
mThumbsUpAction = new PlaybackControlsRow.ThumbsUpAction(activity);
mThumbsDownAction = new PlaybackControlsRow.ThumbsDownAction(activity);
mShuffleAction = new PlaybackControlsRow.ShuffleAction(activity);
mSkipNextAction = new PlaybackControlsRow.SkipNextAction(activity);
mSkipPreviousAction = new PlaybackControlsRow.SkipPreviousAction(activity);
mFastForwardAction = new PlaybackControlsRow.FastForwardAction(activity);
mRewindAction = new PlaybackControlsRow.RewindAction(activity);
mHighQualityAction = new PlaybackControlsRow.HighQualityAction(activity);
mClosedCaptioningAction = new PlaybackControlsRow.ClosedCaptioningAction(activity);
mMoreActions = new PlaybackControlsRow.MoreActions(activity);
/* PrimaryAction setting */
mPrimaryActionsAdapter.add(mSkipPreviousAction);
mPrimaryActionsAdapter.add(mRewindAction);
mPrimaryActionsAdapter.add(mPlayPauseAction);
mPrimaryActionsAdapter.add(mFastForwardAction);
mPrimaryActionsAdapter.add(mSkipNextAction);
/* SecondaryAction setting */
mSecondaryActionsAdapter.add(mThumbsUpAction);
mSecondaryActionsAdapter.add(mThumbsDownAction);
mSecondaryActionsAdapter.add(mRepeatAction);
mSecondaryActionsAdapter.add(mShuffleAction);
mSecondaryActionsAdapter.add(mHighQualityAction);
mSecondaryActionsAdapter.add(mClosedCaptioningAction);
mSecondaryActionsAdapter.add(mMoreActions);
}
private void addOtherRows() {
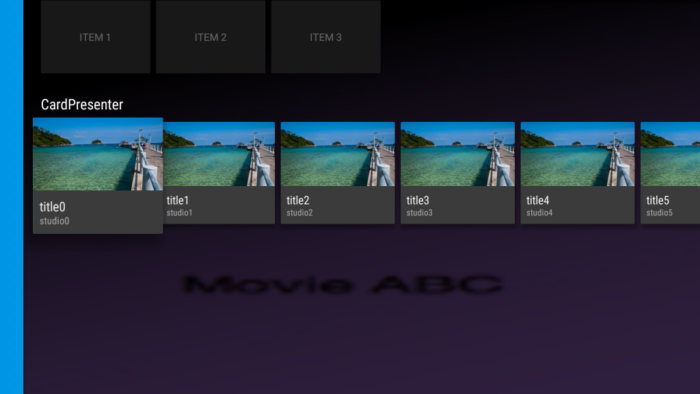
ArrayObjectAdapter listRowAdapter = new ArrayObjectAdapter(new CardPresenter());
Movie movie = new Movie();
movie.setTitle("Title");
movie.setStudio("studio");
movie.setDescription("description");
movie.setCardImageUrl("http://heimkehrend.raindrop.jp/kl-hacker/wp-content/uploads/2014/08/DSC02580.jpg");
listRowAdapter.add(movie);
listRowAdapter.add(movie);
HeaderItem header = new HeaderItem(0, "OtherRows");
mRowsAdapter.add(new ListRow(header, listRowAdapter));
}
}
To launch PlaybackOverlayAcitivity from DetailsActivity, let’s implement setOnActionClickedListener.
        @Override
        protected void onPostExecute(DetailsOverviewRow row) {
            /* 1st row: DetailsOverviewRow */

              /* action setting*/
            SparseArrayObjectAdapter sparseArrayObjectAdapter = new SparseArrayObjectAdapter();
            sparseArrayObjectAdapter.set(0, new Action(ACTION_PLAY_VIDEO, "Play Video"));
            sparseArrayObjectAdapter.set(1, new Action(1, "Action 2", "label"));
            sparseArrayObjectAdapter.set(2, new Action(2, "Action 3", "label"));

            row.setActionsAdapter(sparseArrayObjectAdapter);

            mFwdorPresenter.setOnActionClickedListener(new OnActionClickedListener() {
                @Override
                public void onActionClicked(Action action) {
                    if (action.getId() == ACTION_PLAY_VIDEO) {
                        Intent intent = new Intent(getActivity(), PlaybackOverlayActivity.class);
                        intent.putExtra("Movie", mSelectedMovie);
                        intent.putExtra("shouldStart", true);
                        startActivity(intent);
                    }
                }
            });
I will change the name of item of GridItemPresenter “Item 1” -> “ErrorFragment”, and I will launch this ErrorActivity by clicking this “ErrorFragment” item.
Modify MainFragment, to launch ErrorActivity by intent.
        @Override
        public void onItemClicked(Presenter.ViewHolder itemViewHolder, Object item,
                                  RowPresenter.ViewHolder rowViewHolder, Row row) {
            // each time the item is clicked, code inside here will be executed.
            if (item instanceof Movie) {
                Movie movie = (Movie) item;
                Log.d(TAG, "Item: " + item.toString());
                Intent intent = new Intent(getActivity(), DetailsActivity.class);
                intent.putExtra(DetailsActivity.MOVIE, movie);

                getActivity().startActivity(intent);
            } else if (item instanceof String){
                if (item == "ErrorFragment") {
                    Intent intent = new Intent(getActivity(), ErrorActivity.class);
                    startActivity(intent);
                }
            }
        }
[Update 2015.12.14]: revise & add DetailsOverviewRowPresenter sample implementation, see bottom of this post.
Aim of this chapter – DetailsActivity implementation
Implementing
setOnItemViewClickedListener – onItemClicked callback function in MainFragment After implementation, we can click cards to go to next action. We show content detail information for each Movie item in this chapter.
DetailsActivity, VideoDetailsFragment, and DetailsDescriptionPresenter DetailsActivity is invoked by clicking card in MainActivity. It shows VideoDetailsFragment, which is a layout to show card content.
Implementing click listener in MainFragment
To register a next action when user clicked certain card, we can use setOnItemViewClickedListener method defined in BrowseFragment class (MainFragment class is a sub class of BrowseFragment).
Sample implementation is as follows. This is almost same with setOnItemViewSelectedListener introduced in previous chapter.
    @Override
    public void onActivityCreated(Bundle savedInstanceState) {

        ...

        setupEventListeners();

        picassoBackgroundManager = new PicassoBackgroundManager(getActivity());
    }

    private void setupEventListeners() {
        setOnItemViewSelectedListener(new ItemViewSelectedListener());
        setOnItemViewClickedListener(new ItemViewClickedListener());
    }

    private final class ItemViewClickedListener implements OnItemViewClickedListener {
        @Override
        public void onItemClicked(Presenter.ViewHolder itemViewHolder, Object item,
                                  RowPresenter.ViewHolder rowViewHolder, Row row) {
            // each time the item is clicked, code inside here will be executed.

            }
        }
    }
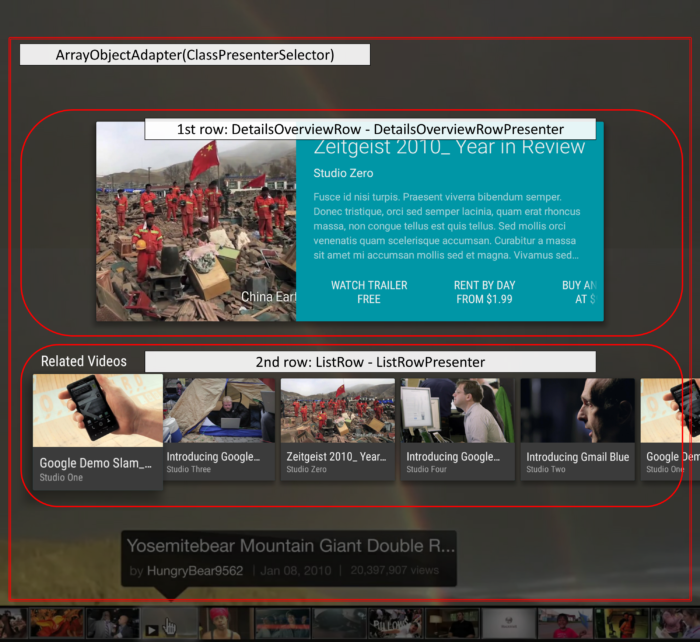
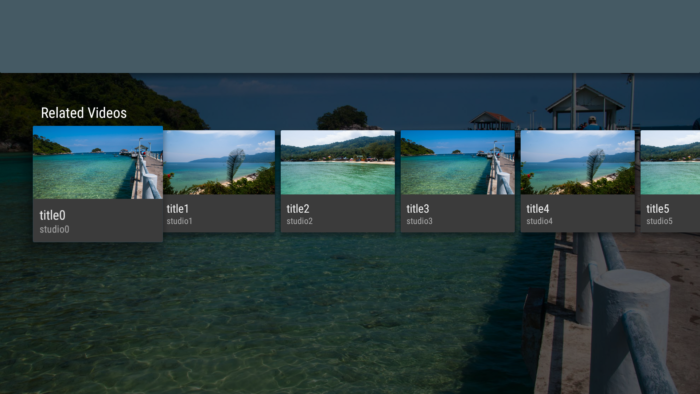
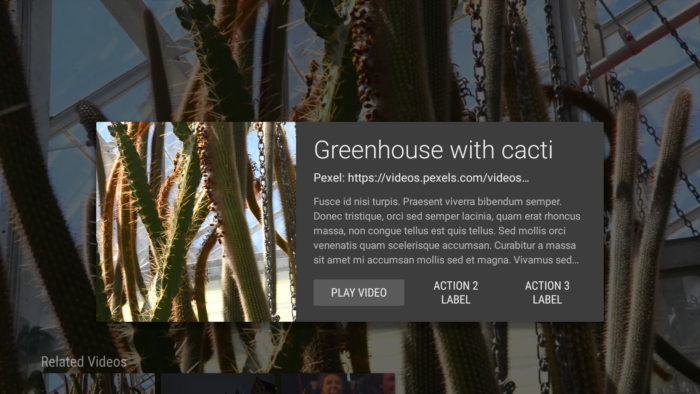
In the Android sample application, we have 2 rows in VideoDetailsFragment. First row is DetailsOverviewRow and second row is ListRow (which is already explained in MainFragment). DetailsOverviewRow shows the content details including picture in the lect, description and some actions are set in the left-bottom.
We can prepare our own Presenter to specify the design layout of DetailsOverviewRow. There are 2 pre-implemented presenters we can use in Leanback support library.
DetailsOverviewRowPresenter: Shown in the above picture, but it is already deprecated in leanback library version 22.2.0.
FullWidthDetailsOverviewRowPresenter: Instead of DetailsOverviewRowPresenter, use this presenter is recommended in the AOSP document.
In the following, I will try to introduce this new FullWidthDetailsOverviewRowPresenter (*updated 2015.12.4: you can also check DetailsOverviewRowPresenter, see bottom of this post). It will specify the design layout of DetailsOverviewRow, which is usually used in the first row of your DetailsFragment to show item details information.
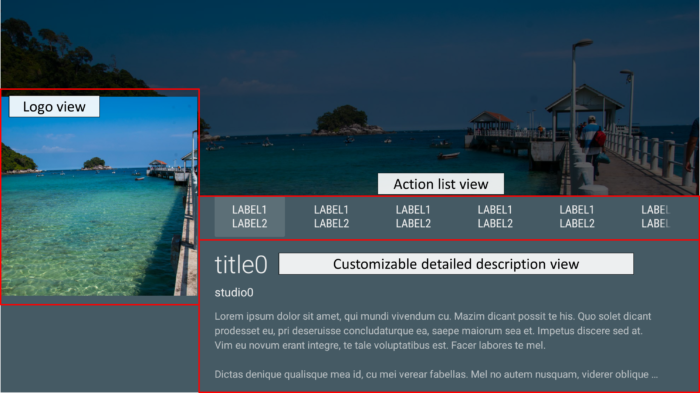
FullWidthDetailsOverviewRowPresenter is consisting of 3 parts, namely
Logo view – customizable (option), by implementing DetailsOverViewLogoPresenter
Action list view
Detailed description view – customizable (MUST), implement subclass of AbstractDetailsDescriptionPresenter
We define “DetailsDescriptionPresenter” which extends AbstractDetailsDescriptionPresenter defined in Leanback libarary. AbstractDetailsDescriptionPresenter decides the design layout of descrption view.
We proceed to create DetailsActivity for showing the UI of content details. The design is specified in VideoDetailsFragment, which is a subclass of DetailsFragment.
Creating DetailsActivity & VideoDetailsFragment is done in the same way with MainActivity & MainFragment introduced in chapter 1.
Second modify VideoDetailsFragment. We will make this VideoDetailsFragment as a sub-class of DetailsFragment. DetailsFragment class is in leanback support library to create UI for content details. In the VideoDetailsFragment, declared private member mFwdorPresenter is the instance of FullWidthDetailsOverviewRowPresenter.
Note that AsyncTask is for executing some tasks in background thread (“doInBackground“) followed by executing some tasks in UI thread (“onPostExecute“). Here, we load a picture image in background, and updating UI in UI thread. You can find information of AsyncTask below.
package com.corochann.androidtvapptutorial;

import android.graphics.Bitmap;
import android.graphics.BitmapFactory;
import android.os.AsyncTask;
import android.os.Bundle;
import android.support.v17.leanback.app.DetailsFragment;
import android.support.v17.leanback.widget.Action;
import android.support.v17.leanback.widget.ArrayObjectAdapter;
import android.support.v17.leanback.widget.ClassPresenterSelector;
import android.support.v17.leanback.widget.DetailsOverviewRow;
import android.support.v17.leanback.widget.FullWidthDetailsOverviewRowPresenter;
import android.support.v17.leanback.widget.HeaderItem;
import android.support.v17.leanback.widget.ListRow;
import android.support.v17.leanback.widget.ListRowPresenter;
import android.support.v17.leanback.widget.SparseArrayObjectAdapter;
import android.util.Log;

import com.squareup.picasso.Picasso;

import java.io.IOException;

/**
 * Created by corochann on 6/7/2015.
 */
public class VideoDetailsFragment extends DetailsFragment {

    private static final String TAG = VideoDetailsFragment.class.getSimpleName();

    private static final int DETAIL_THUMB_WIDTH = 274;
    private static final int DETAIL_THUMB_HEIGHT = 274;


    private static final String MOVIE = "Movie";

    private CustomFullWidthDetailsOverviewRowPresenter mFwdorPresenter;
    private PicassoBackgroundManager mPicassoBackgroundManager;

    private Movie mSelectedMovie;
    private DetailsRowBuilderTask mDetailsRowBuilderTask;

    @Override
    public void onCreate(Bundle savedInstanceState) {
        Log.i(TAG, "onCreate");
        super.onCreate(savedInstanceState);

        mFwdorPresenter = new CustomFullWidthDetailsOverviewRowPresenter(new DetailsDescriptionPresenter());

        mPicassoBackgroundManager = new PicassoBackgroundManager(getActivity());
        mSelectedMovie = (Movie)getActivity().getIntent().getSerializableExtra(MOVIE);

        mDetailsRowBuilderTask = (DetailsRowBuilderTask) new DetailsRowBuilderTask().execute(mSelectedMovie);
        mPicassoBackgroundManager.updateBackgroundWithDelay(mSelectedMovie.getCardImageUrl());;
    }

    @Override
    public void onStop() {
        mDetailsRowBuilderTask.cancel(true);
        super.onStop();
    }

    private class DetailsRowBuilderTask extends AsyncTask<Movie, Integer, DetailsOverviewRow> {
        @Override
        protected DetailsOverviewRow doInBackground(Movie... params) {
            DetailsOverviewRow row = new DetailsOverviewRow(mSelectedMovie);
            try {
                Bitmap poster = Picasso.with(getActivity())
                        .load(mSelectedMovie.getCardImageUrl())
                        .resize(Utils.convertDpToPixel(getActivity().getApplicationContext(), DETAIL_THUMB_WIDTH),
                                Utils.convertDpToPixel(getActivity().getApplicationContext(), DETAIL_THUMB_HEIGHT))
                        .centerCrop()
                        .get();
                row.setImageBitmap(getActivity(), poster);
            } catch (IOException e) {
                Log.w(TAG, e.toString());
            }


            return row;
        }

        @Override
        protected void onPostExecute(DetailsOverviewRow row) {
                    /* 1st row: DetailsOverviewRow */
            SparseArrayObjectAdapter sparseArrayObjectAdapter = new SparseArrayObjectAdapter();
            for (int i = 0; i<10; i++){
                sparseArrayObjectAdapter.set(i, new Action(i, "label1", "label2"));
            }
            row.setActionsAdapter(sparseArrayObjectAdapter);

        /* 2nd row: ListRow */
            ArrayObjectAdapter listRowAdapter = new ArrayObjectAdapter(new CardPresenter());
            for(int i = 0; i < 10; i++){
                Movie movie = new Movie();
                if(i%3 == 0) {
                    movie.setCardImageUrl("http://heimkehrend.raindrop.jp/kl-hacker/wp-content/uploads/2014/08/DSC02580.jpg");
                } else if (i%3 == 1) {
                    movie.setCardImageUrl("http://heimkehrend.raindrop.jp/kl-hacker/wp-content/uploads/2014/08/DSC02630.jpg");
                } else {
                    movie.setCardImageUrl("http://heimkehrend.raindrop.jp/kl-hacker/wp-content/uploads/2014/08/DSC02529.jpg");
                }
                movie.setTitle("title" + i);
                movie.setStudio("studio" + i);
                listRowAdapter.add(movie);
            }
            HeaderItem headerItem = new HeaderItem(0, "Related Videos");

            ClassPresenterSelector classPresenterSelector = new ClassPresenterSelector();
            mFwdorPresenter.setInitialState(FullWidthDetailsOverviewRowPresenter.STATE_SMALL);
            Log.e(TAG, "mFwdorPresenter.getInitialState: " +mFwdorPresenter.getInitialState());

            classPresenterSelector.addClassPresenter(DetailsOverviewRow.class, mFwdorPresenter);
            classPresenterSelector.addClassPresenter(ListRow.class, new ListRowPresenter());

            ArrayObjectAdapter adapter = new ArrayObjectAdapter(classPresenterSelector);
            /* 1st row */
            adapter.add(row);
            /* 2nd row */
            adapter.add(new ListRow(headerItem, listRowAdapter));
            /* 3rd row */
            //adapter.add(new ListRow(headerItem, listRowAdapter));
            setAdapter(adapter);

        }
    }
}
Note that constructor of adapter is defferent between MainFragment and VideoDetailsFragment. We are only using ListRow – ListRowPresenter in the MainFragment. In that case we can instantiate adapter by setting Presenter itself like
adapter = new ArrayObjectAdapter(new ListRowPresenter());
However, we are using DetailsOverviewRow – FullWidthDetailsOverviewRowPresenter & ListRow – ListRowPresenter in VideoDetails Fragment. ClassPresenterSelector defines this correspondence, and we can use it in the argument of constructor of adapter.
ClassPresenterSelector classPresenterSelector = new ClassPresenterSelector();
classPresenterSelector.addClassPresenter(DetailsOverviewRow.class, mFwdorPresenter);
classPresenterSelector.addClassPresenter(ListRow.class, new ListRowPresenter());
adapter = new ArrayObjectAdapter(classPresenterSelector);
Next, add description member in Movie class, you can implement Getter and Setter method by [Alt]+[Insert] in Android studio. Also, make MovieSerializable so that we can pass this object through intent. Because we pass Movie object through intent from MainActivity to DetailsActivity.
public class Movie implements Serializable {

    private static final String TAG = Movie.class.getSimpleName();

    static final long serialVersionUID = 727566175075960653L;
    private long id;
    private String title;
    private String studio;
    private String description;
    private String cardImageUrl;

    ...

    public String getDescription() {
        return description;
    }

    public void setDescription(String description) {
        this.description = description;
    }

    ...

}
Copy DetailsDescriptionPresenter from AOSP sample source code as follows. Again, DetailsDescriptionPresenter extends AbstractDetailsDescriptionPresenter, which decides the design layout of descrption view.
/*
 * Copyright (C) 2014 The Android Open Source Project
 *
 * Licensed under the Apache License, Version 2.0 (the "License"); you may not use this file except
 * in compliance with the License. You may obtain a copy of the License at
 *
 * http://www.apache.org/licenses/LICENSE-2.0
 *
 * Unless required by applicable law or agreed to in writing, software distributed under the License
 * is distributed on an "AS IS" BASIS, WITHOUT WARRANTIES OR CONDITIONS OF ANY KIND, either express
 * or implied. See the License for the specific language governing permissions and limitations under
 * the License.
 */

package com.corochann.androidtvapptutorial;

import android.support.v17.leanback.widget.AbstractDetailsDescriptionPresenter;

public class DetailsDescriptionPresenter extends AbstractDetailsDescriptionPresenter {

    @Override
    protected void onBindDescription(ViewHolder viewHolder, Object item) {
        Movie movie = (Movie) item;

        if (movie != null) {
            viewHolder.getTitle().setText(movie.getTitle());
            viewHolder.getSubtitle().setText(movie.getStudio());
            viewHolder.getBody().setText(movie.getDescription());
        }

    }
}
Finally, modify MainFragment to send intent to launch DetailsActivity.
    private void setupEventListeners() {
        setOnItemViewSelectedListener(new ItemViewSelectedListener());
        setOnItemViewClickedListener(new ItemViewClickedListener());
    }

    private final class ItemViewClickedListener implements OnItemViewClickedListener {
        @Override
        public void onItemClicked(Presenter.ViewHolder itemViewHolder, Object item,
                                  RowPresenter.ViewHolder rowViewHolder, Row row) {
            // each time the item is clicked, code inside here will be executed.
            if (item instanceof Movie) {
                Movie movie = (Movie) item;
                Log.d(TAG, "Item: " + item.toString());
                Intent intent = new Intent(getActivity(), DetailsActivity.class);
                intent.putExtra(DetailsActivity.MOVIE, movie);

                getActivity().startActivity(intent);
            }
        }
    }
Build and Run!
Now you can see the content details by clicking card.
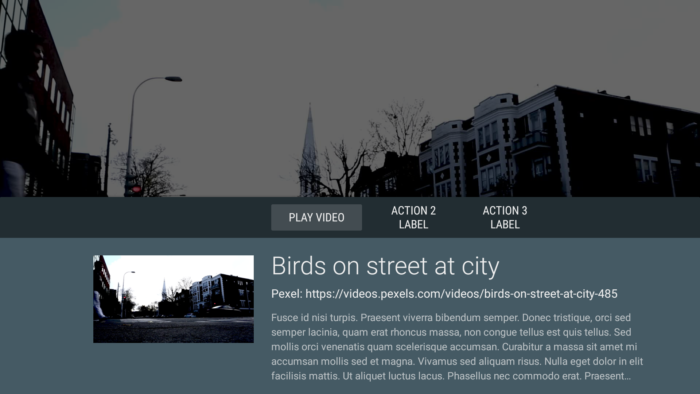
Initial Display, Logo is on the left, background is on the top half, and description is on the bottom half.
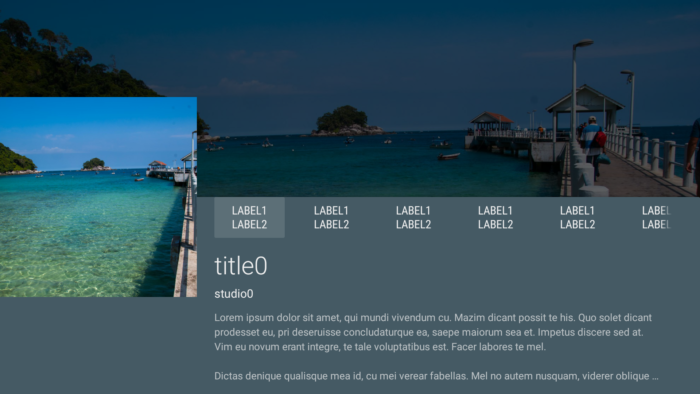
When user press “down” key, description view will take full screen.
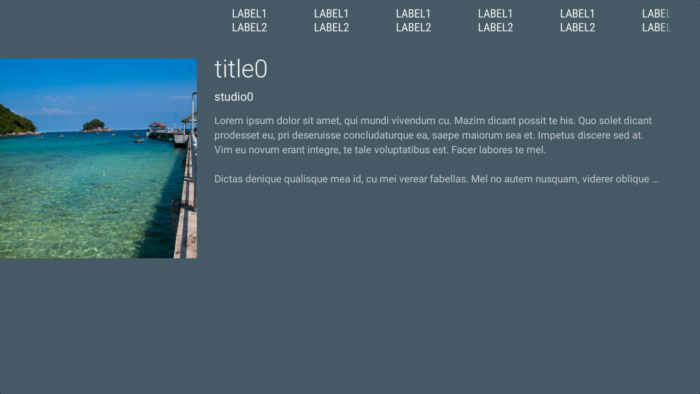
When user press “down” key again, next row (ListRow in this example) will appear.
Please check updated source code on github if you are interested in (already deprecated) DetailsOverviewRowPresenter implementation. Why I updated this code? Because it seems still some developer prefers DetailsOverviewRowPresenter design, even if it was deprecated!
Implementing background image update feature. Application was boring with no background, and it becomes much nice if it has appropriate background. Just setting background is easy, though, Android TV sample application explains how to dynamically change background linking with your current selection of contents.
Before explanation of background change, I start explanation of onItemSelected callback function so that we get the event notification when the item is selected. Next, I will show simple background change implementation followed by better performance implementation using Picasso library.
BrowseFragment supports to set listener when the itemview is selected & clicked. Current target is to be get notified when the user move the cursor and change the selection of item.
we can use setOnItemViewSelectedListener(OnItemViewSelectedListener listener) function for this purpose. In the argument, you can put the listener class which should implement OnItemViewSelectedListener interface which is also provided by leanback library. Then, you can implement onItemSelected callback function, which is the function called when an item is selected.
    @Override
    public void onActivityCreated(Bundle savedInstanceState) {
        Log.i(TAG, "onActivityCreated");
        super.onActivityCreated(savedInstanceState);

        setupUIElements();

        loadRows();

        setupEventListeners();
    }

    private void setupEventListeners() {
        setOnItemViewSelectedListener(new ItemViewSelectedListener());
    }

    private final class ItemViewSelectedListener implements OnItemViewSelectedListener {
        @Override
        public void onItemSelected(Presenter.ViewHolder itemViewHolder, Object item,
                                   RowPresenter.ViewHolder rowViewHolder, Row row) {
            // each time the item is selected, code inside here will be executed.
        }
    }
We will proceed to implement background change function in the following. Here I arranged to create SimpleBackgroundManager, and PicassoBackgroundManager to handle background image (Android TV sample application is doing it inside MainFragment.java).
SimpleBackgroundManager
There is explanation in official developer’s site, see Update the Background for reference. I wrote some test code below.
Right click package name → New → class → SimpleBackgroundManager
This SimpleBackgroundManager keeps a member mBackgroundManager of BackgroundManager class, which handles the actual background change. This BackgroundManager instance is a singleton instance which can be obtained via BackgroundManager.getInstance().
package com.corochann.androidtvapptutorial;

import android.app.Activity;
import android.content.ContentResolver;
import android.content.Context;
import android.graphics.drawable.Drawable;
import android.net.Uri;
import android.support.v17.leanback.app.BackgroundManager;
import android.util.DisplayMetrics;

import java.io.FileNotFoundException;
import java.io.InputStream;
import java.net.URI;


/**
 * Created by corochann on 3/7/2015.
 */
public class SimpleBackgroundManager {

    private static final String TAG = SimpleBackgroundManager.class.getSimpleName();

    private final int DEFAULT_BACKGROUND_RES_ID = R.drawable.default_background;
    private static Drawable mDefaultBackground;

    private Activity mActivity;
    private BackgroundManager mBackgroundManager;

    public SimpleBackgroundManager(Activity activity) {
        mActivity = activity;
        mDefaultBackground = activity.getDrawable(DEFAULT_BACKGROUND_RES_ID);
        mBackgroundManager = BackgroundManager.getInstance(activity);
        mBackgroundManager.attach(activity.getWindow());
        activity.getWindowManager().getDefaultDisplay().getMetrics(new DisplayMetrics());
    }

    public void updateBackground(Drawable drawable) {
        mBackgroundManager.setDrawable(drawable);
    }

    public void clearBackground() {
        mBackgroundManager.setDrawable(mDefaultBackground);
    }

}
At first, instance of BackgroundManager is created in Constructor. It must be attached with Window before updating background, and these initialization is done in constructor.
updateBackground method will change the background, and clearBackground method will update the background to default image. (I have added the res/drawable/default_background.xml and updated res/values/colors.xml.)
Modification of MainFragment is small.
public class MainFragment extends BrowseFragment {

    ...

    private static SimpleBackgroundManager simpleBackgroundManager = null;

    @Override
    public void onActivityCreated(Bundle savedInstanceState) {

        ...

        simpleBackgroundManager = new SimpleBackgroundManager(getActivity());
    }

    private void setupEventListeners() {
        setOnItemViewSelectedListener(new ItemViewSelectedListener());
    }

    private final class ItemViewSelectedListener implements OnItemViewSelectedListener {
        @Override
        public void onItemSelected(Presenter.ViewHolder itemViewHolder, Object item,
                                   RowPresenter.ViewHolder rowViewHolder, Row row) {
            // each time the item is selected, code inside here will be executed.
            if (item instanceof String) { // GridItemPresenter row
                simpleBackgroundManager.clearBackground();
            } else if (item instanceof Movie) { // CardPresenter row
                simpleBackgroundManager.updateBackground(getActivity().getDrawable(R.drawable.movie));
            }
        }
    }
Build and run!
We can check background is updated depending on the selection of the row. Also the Background will be back to default when you go back to GridItemPresenter row.
Let’s improve SimpleBackgroundManager implementation. What we will improve is following.
Delay updating background In the previous implementation, main thread will always try to update background when user is moving their cursor, and changing select item. It is busy, and may cause bad performance. Below we will implement TimerTask to wait certain period of time from updating background image.
Image handling by using Picasso library Picasso library is “A powerful image downloading and caching library for Android“. We will use it for more easier image resource handling.
Create new class PicassoBackgroundManager, implement as follows
package com.corochann.androidtvapptutorial;

import android.app.Activity;
import android.graphics.Bitmap;
import android.graphics.drawable.Drawable;
import android.os.Handler;
import android.os.Looper;
import android.support.v17.leanback.app.BackgroundManager;
import android.util.DisplayMetrics;
import android.util.Log;

import com.squareup.picasso.Picasso;
import com.squareup.picasso.Target;

import java.net.URI;
import java.net.URISyntaxException;
import java.util.Timer;
import java.util.TimerTask;

/**
 * Created by corochann on 3/7/2015.
 */
public class PicassoBackgroundManager {

    private static final String TAG = PicassoBackgroundManager.class.getSimpleName();

    private static int BACKGROUND_UPDATE_DELAY = 500;
    private final int DEFAULT_BACKGROUND_RES_ID = R.drawable.default_background;
    private static Drawable mDefaultBackground;
    // Handler attached with main thread
    private final Handler mHandler = new Handler(Looper.getMainLooper());

    private Activity mActivity;
    private BackgroundManager mBackgroundManager = null;
    private DisplayMetrics mMetrics;
    private URI mBackgroundURI;
    private PicassoBackgroundManagerTarget mBackgroundTarget;

    Timer mBackgroundTimer; // null when no UpdateBackgroundTask is running.

    public PicassoBackgroundManager (Activity activity) {
        mActivity = activity;
        mDefaultBackground = activity.getDrawable(DEFAULT_BACKGROUND_RES_ID);
        mBackgroundManager = BackgroundManager.getInstance(activity);
        mBackgroundManager.attach(activity.getWindow());
        mBackgroundTarget = new PicassoBackgroundManagerTarget(mBackgroundManager);
        mMetrics = new DisplayMetrics();
        activity.getWindowManager().getDefaultDisplay().getMetrics(mMetrics);

    }

    /**
     * if UpdateBackgroundTask is already running, cancel this task and start new task.
     */
    private void startBackgroundTimer() {
        if (mBackgroundTimer != null) {
            mBackgroundTimer.cancel();
        }
        mBackgroundTimer = new Timer();
        /* set delay time to reduce too much background image loading process */
        mBackgroundTimer.schedule(new UpdateBackgroundTask(), BACKGROUND_UPDATE_DELAY);
    }


    private class UpdateBackgroundTask extends TimerTask {
        @Override
        public void run() {
            /* Here is TimerTask thread, not UI thread */
            mHandler.post(new Runnable() {
                @Override
                public void run() {
                     /* Here is main (UI) thread */
                    if (mBackgroundURI != null) {
                        updateBackground(mBackgroundURI);
                    }
                }
            });
        }
    }

    public void updateBackgroundWithDelay(String url) {
        try {
            URI uri = new URI(url);
            updateBackgroundWithDelay(uri);
        } catch (URISyntaxException e) {
            /* skip updating background */
            Log.e(TAG, e.toString());
        }
    }

    /**
     * updateBackground with delay
     * delay time is measured in other Timer task thread.
     * @param uri
     */
    public void updateBackgroundWithDelay(URI uri) {
        mBackgroundURI = uri;
        startBackgroundTimer();
    }

    private void updateBackground(URI uri) {
        try {
            Picasso.with(mActivity)
                    .load(uri.toString())
                    .resize(mMetrics.widthPixels, mMetrics.heightPixels)
                    .centerCrop()
                    .error(mDefaultBackground)
                    .into(mBackgroundTarget);
        } catch (Exception e) {
            Log.e(TAG, e.toString());
        }
    }

    /**
     * Copied from AOSP sample code.
     * Inner class
     * Picasso target for updating default_background images
     */
    public class PicassoBackgroundManagerTarget implements Target {
        BackgroundManager mBackgroundManager;

        public PicassoBackgroundManagerTarget(BackgroundManager backgroundManager) {
            this.mBackgroundManager = backgroundManager;
        }

        @Override
        public void onBitmapLoaded(Bitmap bitmap, Picasso.LoadedFrom loadedFrom) {
            this.mBackgroundManager.setBitmap(bitmap);
        }

        @Override
        public void onBitmapFailed(Drawable drawable) {
            this.mBackgroundManager.setDrawable(drawable);
        }

        @Override
        public void onPrepareLoad(Drawable drawable) {
            // Do nothing, default_background manager has its own transitions
        }

        @Override
        public boolean equals(Object o) {
            if (this == o)
                return true;
            if (o == null || getClass() != o.getClass())
                return false;

            PicassoBackgroundManagerTarget that = (PicassoBackgroundManagerTarget) o;

            if (!mBackgroundManager.equals(that.mBackgroundManager))
                return false;

            return true;
        }

        @Override
        public int hashCode() {
            return mBackgroundManager.hashCode();
        }
    }


}
Now, we will replace from SimpleBackgroundManager to PicassoBackgroundManager in MainFragment.java
public class MainFragment extends BrowseFragment {
...
private static PicassoBackgroundManager picassoBackgroundManager = null;
@Override
public void onActivityCreated(Bundle savedInstanceState) {
...
picassoBackgroundManager = new PicassoBackgroundManager(getActivity());
}
private void setupEventListeners() {
setOnItemViewSelectedListener(new ItemViewSelectedListener());
}
private final class ItemViewSelectedListener implements OnItemViewSelectedListener {
@Override
public void onItemSelected(Presenter.ViewHolder itemViewHolder, Object item,
RowPresenter.ViewHolder rowViewHolder, Row row) {
if (item instanceof String) { // GridItemPresenter
picassoBackgroundManager.updateBackgroundWithDelay("http://heimkehrend.raindrop.jp/kl-hacker/wp-content/uploads/2014/10/RIMG0656.jpg");
} else if (item instanceof Movie) { // CardPresenter
picassoBackgroundManager.updateBackgroundWithDelay(((Movie) item).getCardImageUrl());
}
}
}
...
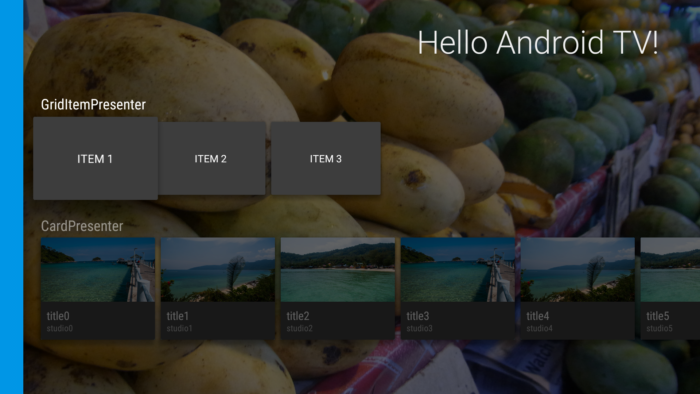
private void loadRows() {
mRowsAdapter = new ArrayObjectAdapter(new ListRowPresenter());
...
for(int i=0; i<10; i++) {
Movie movie = new Movie();
if(i%3 == 0) {
movie.setCardImageUrl("http://heimkehrend.raindrop.jp/kl-hacker/wp-content/uploads/2014/08/DSC02580.jpg");
} else if (i%3 == 1) {
movie.setCardImageUrl("http://heimkehrend.raindrop.jp/kl-hacker/wp-content/uploads/2014/08/DSC02630.jpg");
} else {
movie.setCardImageUrl("http://heimkehrend.raindrop.jp/kl-hacker/wp-content/uploads/2014/08/DSC02529.jpg");
}
movie.setTitle("title" + i);
movie.setStudio("studio" + i);
cardRowAdapter.add(movie);
}
Build and run!
We can check background is updated after 500 ms thanks to the timer task. And we are getting the background image from web by using Picasso.